Development history
Development history enables you to review your development activity and associated quality. Pull requests and commits are scanned and listed here.
This can serve as an integral part of your code review process. Recommendation Engine (RE) is also integrated with the pull request scan so that you can prevent issues from occuring in a release.
Pull Request workflow
You can now use BrowserStack Code Quality to review pull requests made on your GitHub, Bitbucket, GitLab or Azure DevOps (merge requests) repositories. When a new pull request is made, BrowserStack Code Quality automatically scans the changed files and reports various issues on BrowserStack Code Quality UI. Thus BrowserStack Code Quality facilitates a more effective and easier review of changes in your code.
Setting up pull request workflow
To set up pull request workflow you should configure webhooks and enable pull request workflow for your repositories.
Configuring webhooks for pull request workflow
GitHub, Bitbucket, GitLab or Azure DevOps notify BrowserStack Code Quality when a new pull request is created via webhooks. If the repository credentials (or version control account) configured in BrowserStack Code Quality for a repository has sufficient privileges, BrowserStack Code Quality will automatically setup webhook on GitHub, Bitbucket, GitLab or Azure DevOps.
Pull Request Feature for Forked GitHub Repositories
The platform now supports the Pull Request feature for forked GitHub repositories, streamlining collaboration and contribution workflows.
Feature Highlights:
- Pull Requests for Forks:
Users working on forked GitHub repositories can now create pull requests directly from the platform, allowing them to propose changes to the original repository seamlessly. - Improved Collaboration:
This feature enhances teamwork by enabling contributors to collaborate effectively on open-source or shared projects. - Seamless Integration:
The pull request functionality integrates smoothly with GitHub’s existing workflows, ensuring a consistent and intuitive user experience. - Support for Custom Branches:
Users can create pull requests from any branch within their forked repository, providing flexibility in managing contributions.
Benefits:
- Facilitates smoother collaboration for contributors working on forked repositories.
- Simplifies the process of proposing changes to the original repository.
- Improves project workflow by enabling direct pull requests from forks without needing external tools.
This enhancement empowers users to contribute more efficiently to GitHub repositories, whether they are collaborators or independent contributors working on forks.
Note:If your BrowserStack Code Quality and version control system (such as Bitbucket) is hosted on different networks, you may have to make BrowserStack Code Quality available to the other network through URL forwarding. Read this guide on URL forwarding for information.
Enabling pull request workflow for a repository
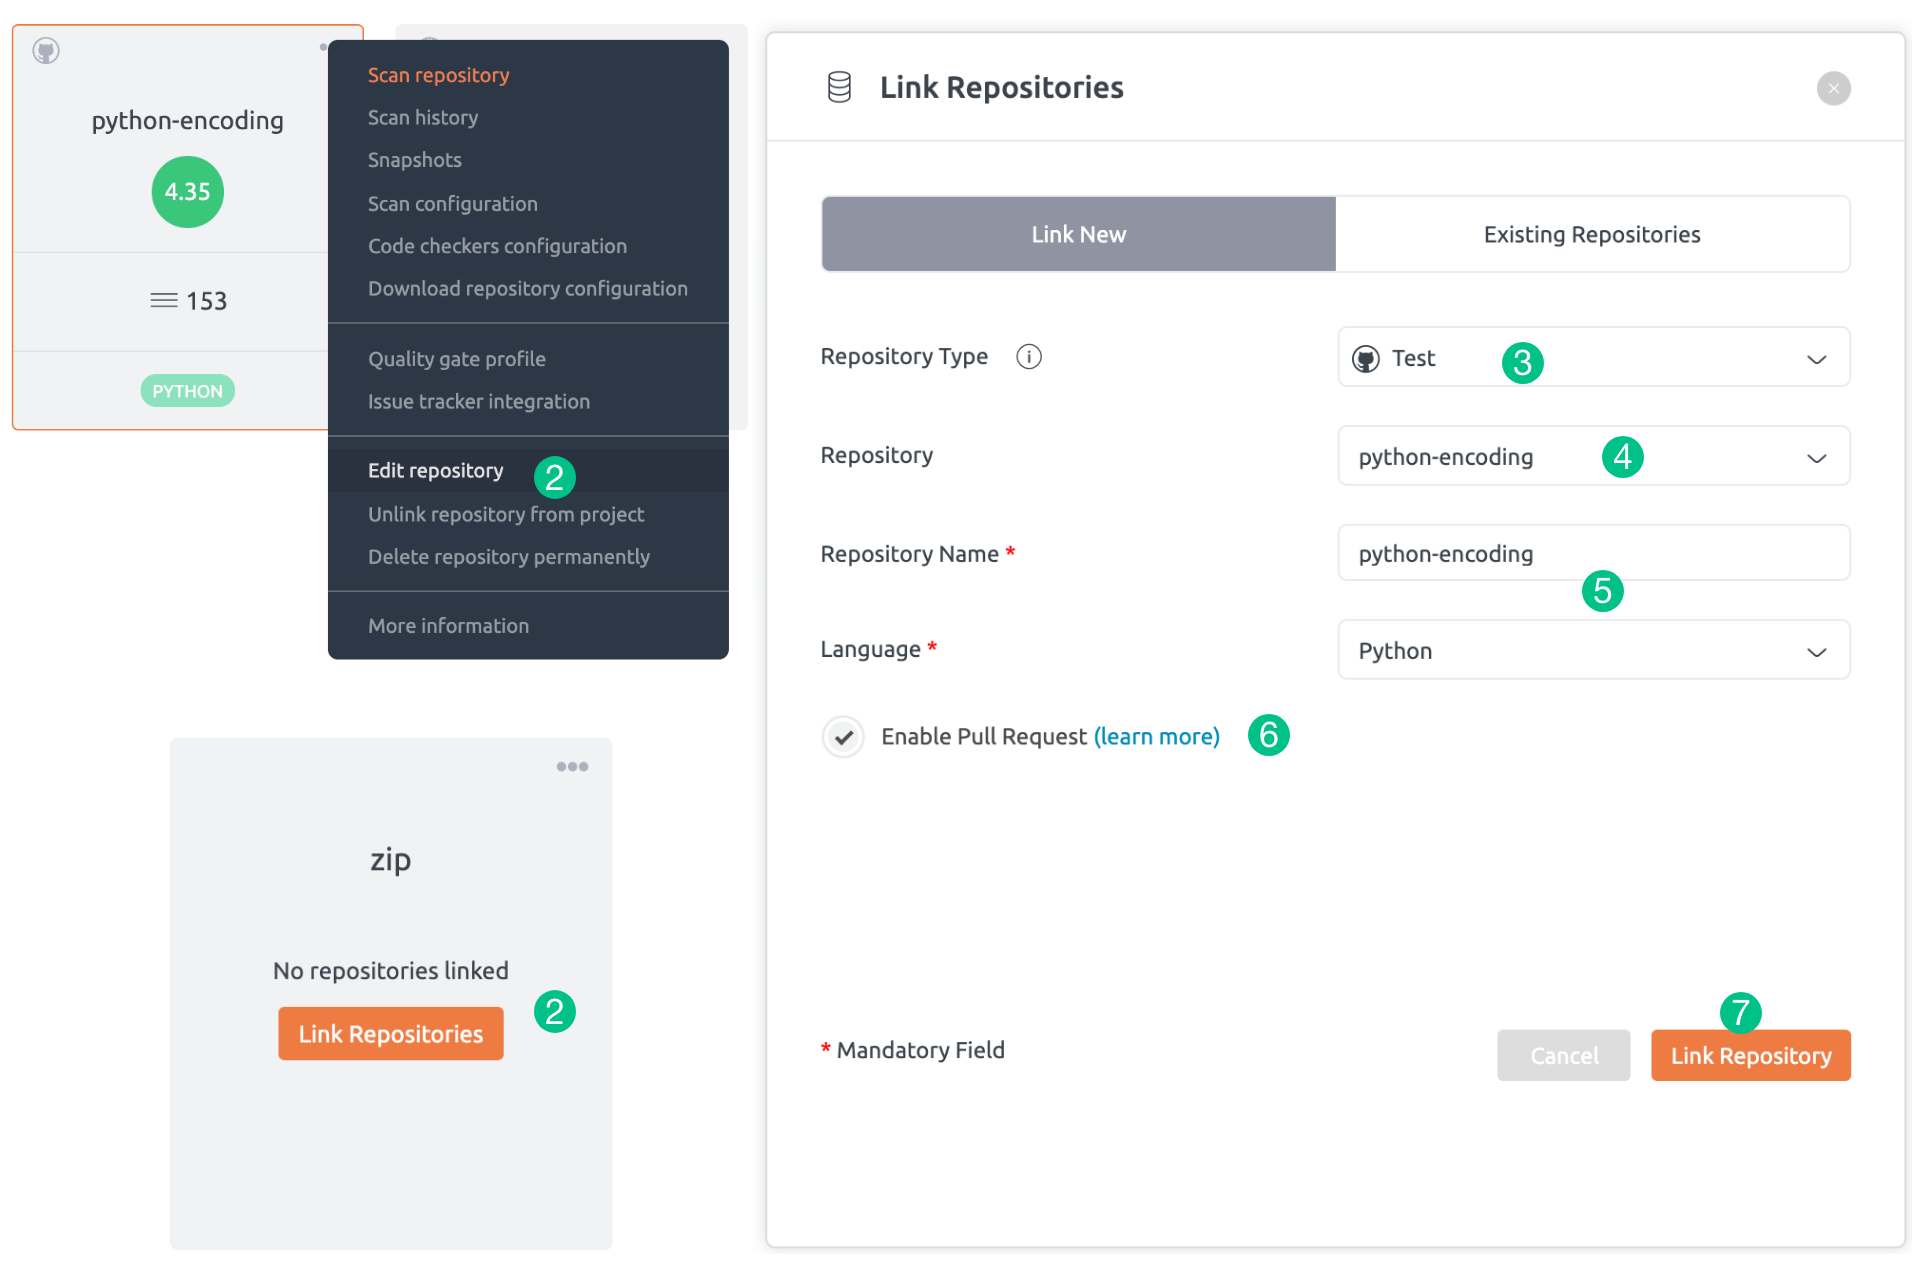
You can enable pull request workflow in BrowserStack Code Quality while linking a repository or later on when you decide to enable it. Enabling it during linking a repository is easy. Just select (or check) “Enable pull request” option from link repository pop-up.
You can update this setting or enable pull request at a later point in time from the “Edit repository” pop-up.
1. Using Version Control Account (VCA)
- For creating a new version control, refer to these steps.
- Once the new VCA account is already created, users can Edit repository or Link repository to this VCA account.
- Select your VCA account from the Repository Type dropdown list.
- The default repositories will be fetched for that selected repository type.
- Type in a repository name of your choice in the Repository Name field and select the desired language (e.g. C/Java or etc.)
- By default, the Enable Pull Request radio button is disabled. Tick the checkbox to enable the pull request workflow.
- Click on the “Link Repository” button in case of linking the repository, else click on the “Save” button if you are editing the repository.
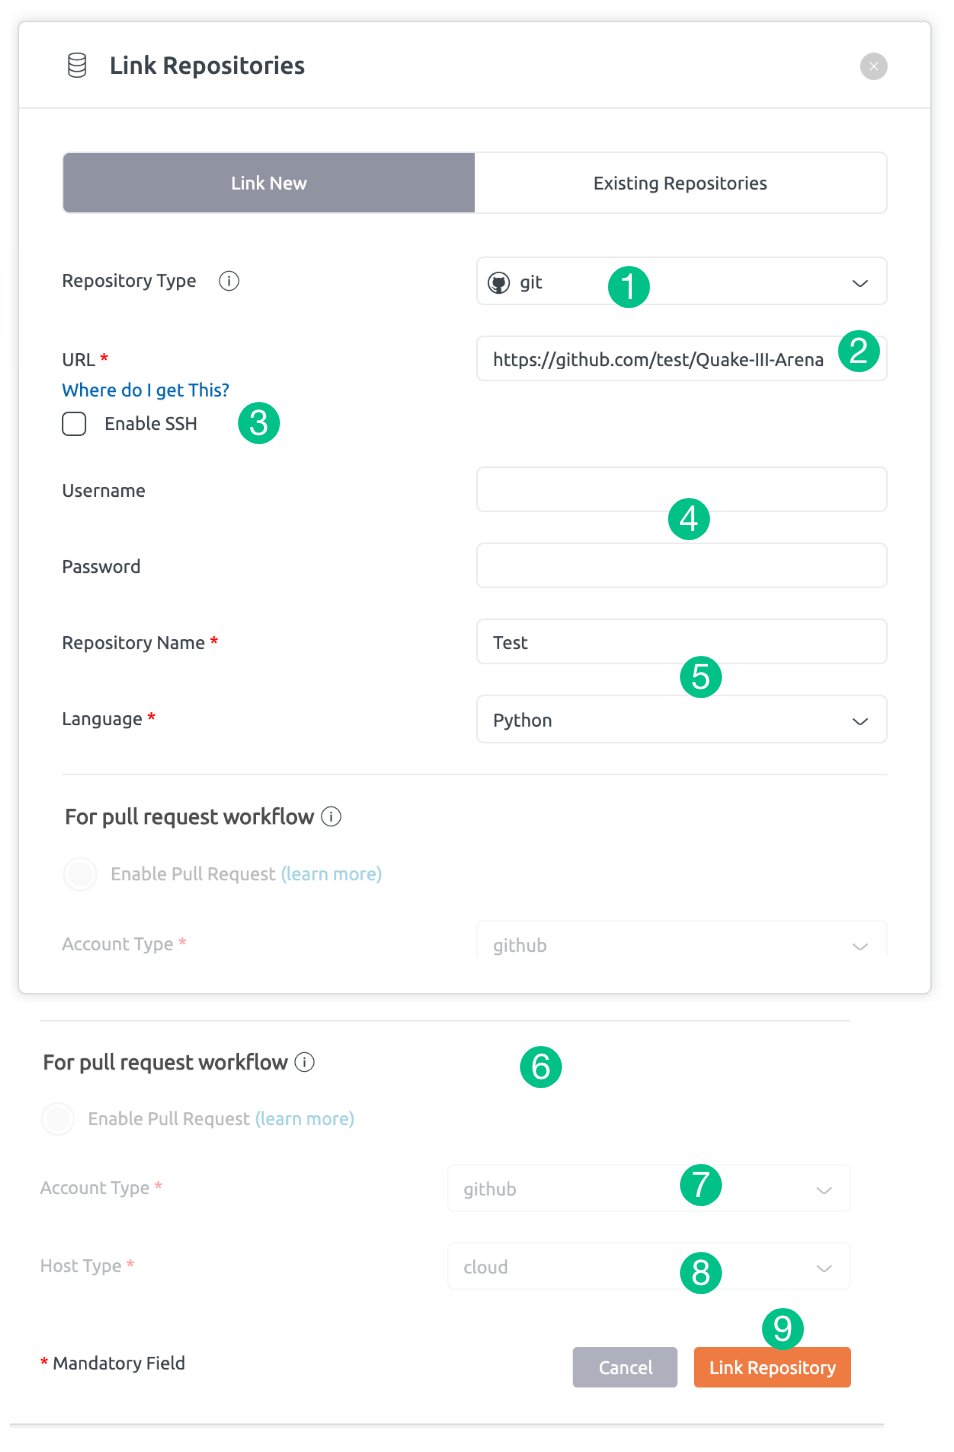
2. Using GIT account
- Select the repository type as “Git”.
- Enter the valid Git URL.
- Users can link repositories using SSH. Refer to these steps. (Pull request workflow is not supported for SSH)
- Enter your username and password.
- Type in a repository name of your choice in the Repository Name field and select the desired language (e.g. C/Java or etc.)
- When the user enters the valid username and password, then the pull request workflow is enabled, else it is disabled.
- Select your desired account type. Depending on your Git URL, the account type will be auto-populated.
- Select your host type. Host types can be cloud and on-premise. Depending on your Git URL, the host type will be auto-populated.
- Click on the Link Repository button to link Git account with repository or else, click on the “Save” button if you edited the repository.
Using pull request workflow
When a new pull request is created on your GitHub, Bitbucket, GitLab or Azure DevOps repository, BrowserStack Code Quality automatically scans the changed files. Status of this scan can be monitored from GitHub, Bitbucket, GitLab or Azure DevOps.
Pull request scan status can also be monitored from the “Development History” page in BrowserStack Code Quality UI.
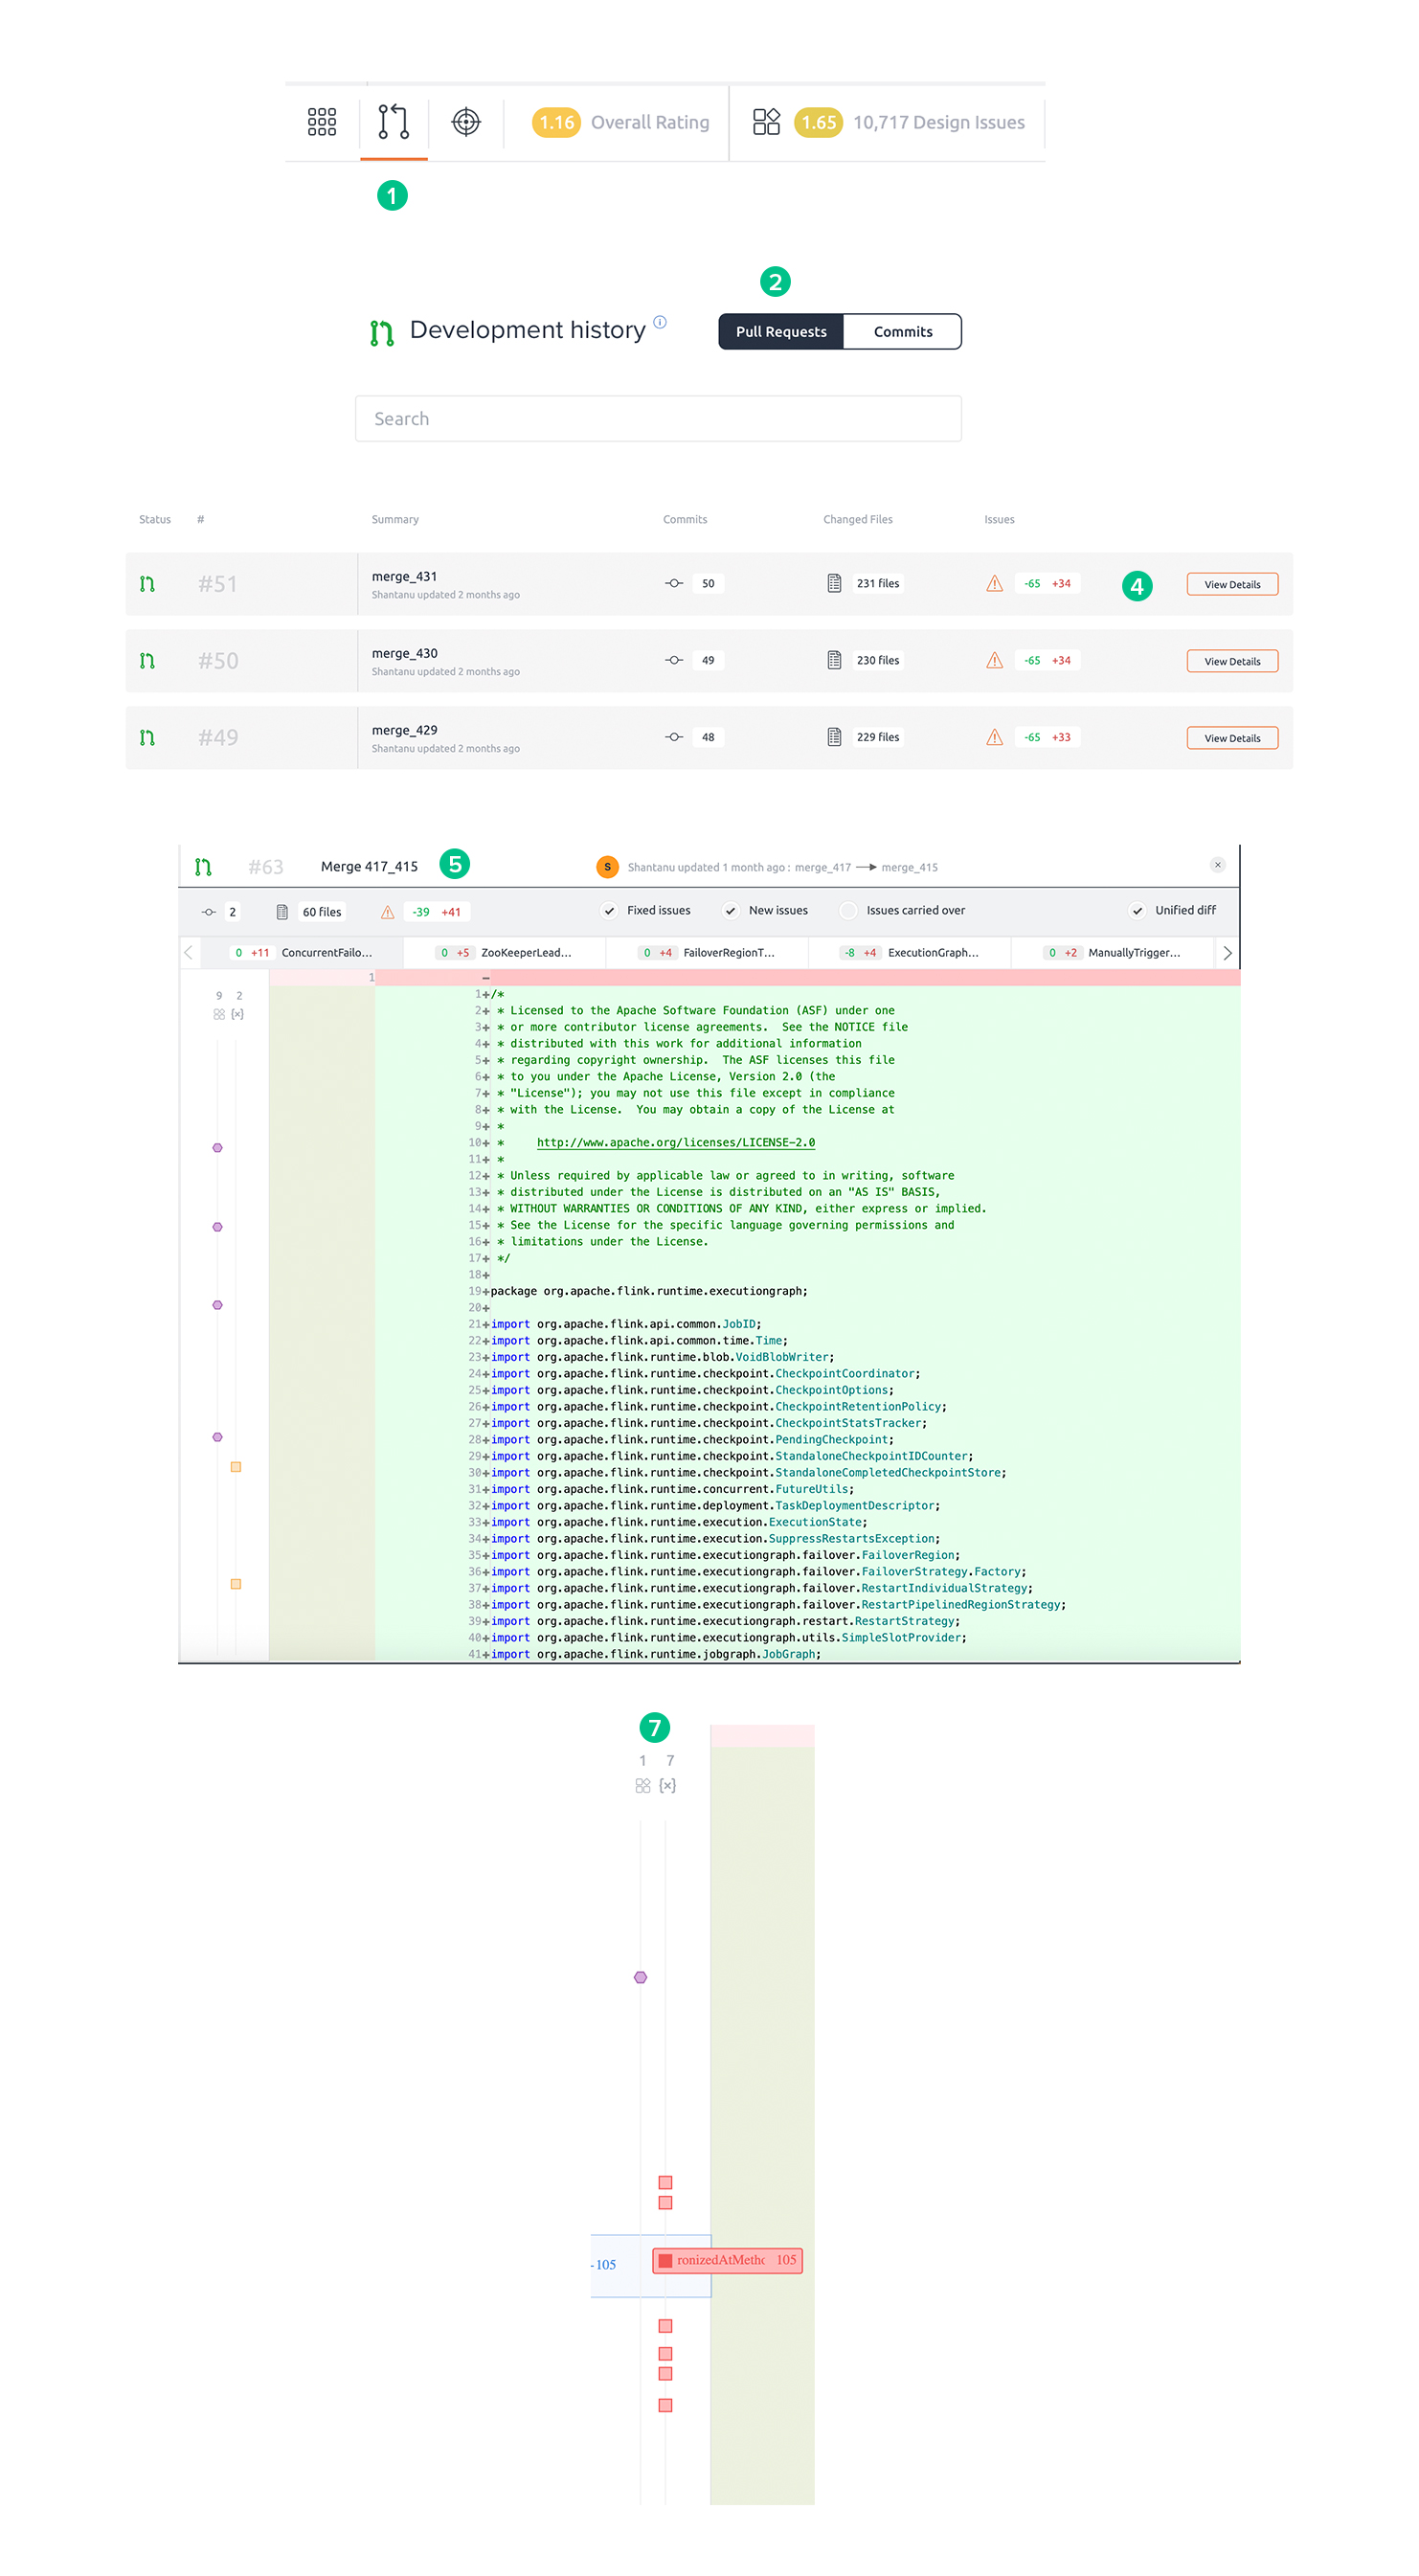
Pull request review can be done from the “Development History” page in a repository. This page may not be available if the pull request workflow is disabled. Read the documentation on enabling pull request workflow to know more.
Steps:
- Open “Development History” page from node summary bar
- Navigate to the pull requests tab.
- A list of available pull requests can be seen here
- Select a pull request you want to review by clicking it.
- Pull request details pop-up will open
- Various kinds of issues such as code issues, anti-patterns, etc that are newly created, fixed, or carried over can be seen here.
- Use code lane view on the left-hand side to quickly locate issues in a file by clicking them.
- Issues will also be annotated on the margin of the code view.
Pull requests Quality Gate
Quality Gate states whether your pull request has passed or failed in quality, depending on certain configurations. There is a default configuration file, but the user can update the configuration file with respective thresholds depending on the requirements.
Refer to this article to understand more about the Embold configuration JSON file.
Beta limitations
- On-premise and cloud versions of Bitbucket, Github, and GitLab are supported.
- The cloud version of Azure DevOps is supported and can be linked through a version control account.
- Pull request workflow will not be available for open-source cloud accounts.
- Forked repositories are not supported.
For more information on the version control account refer to this article.
URL Forwarding
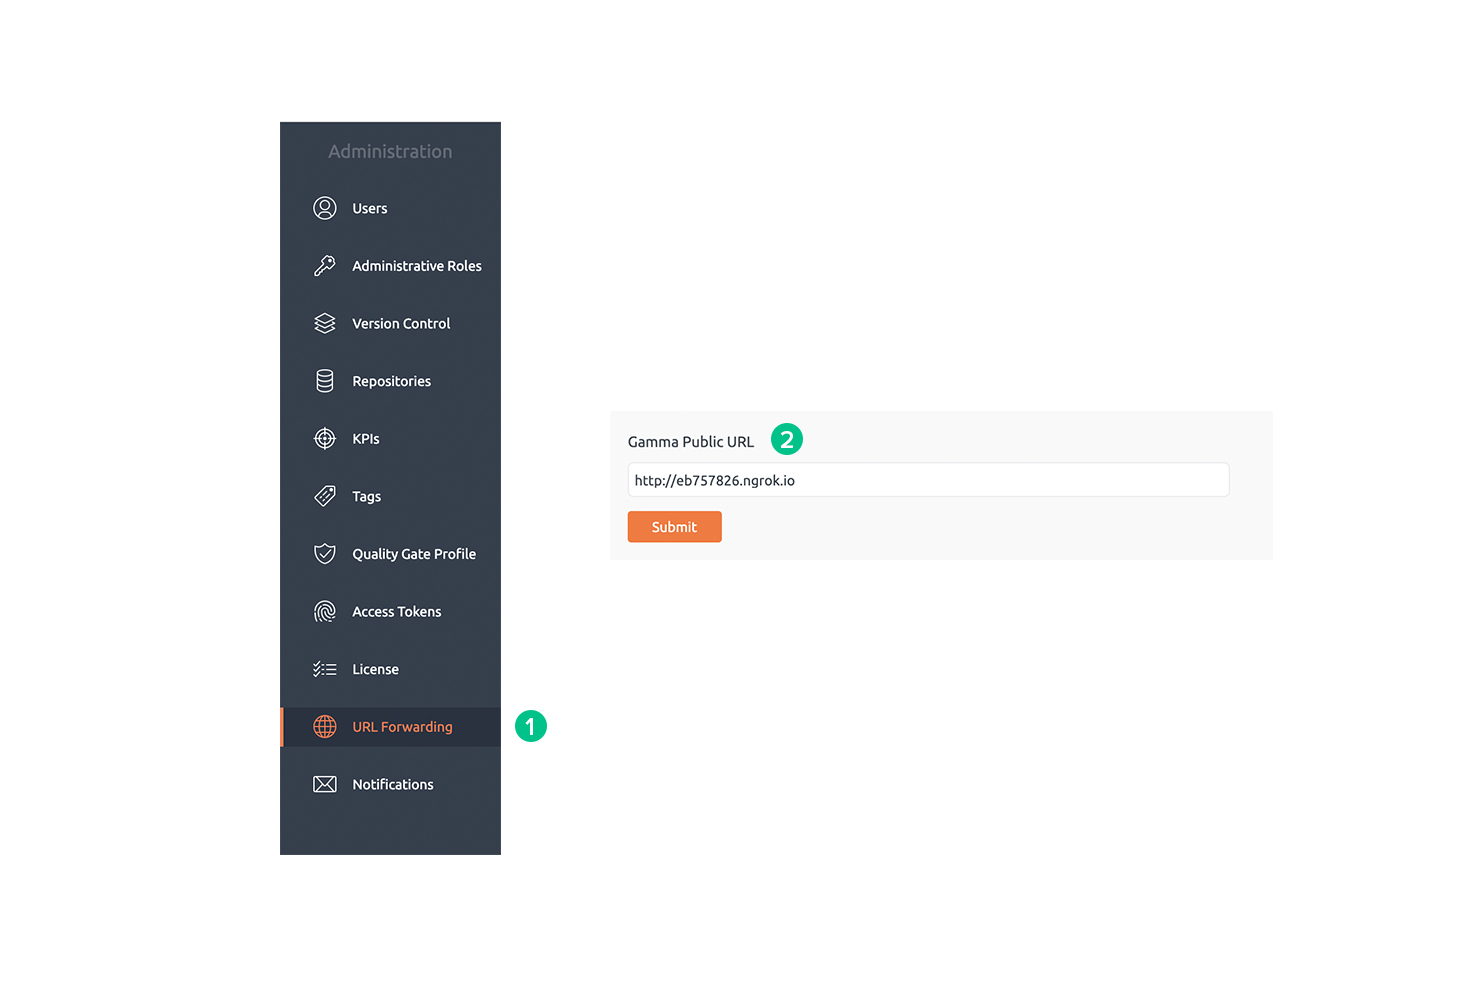
In case BrowserStack Code Quality is hosted on a local/private network you may want to make BrowserStack Code Quality available to Github/Bitbucket in order to receive notifications when a pull request is created. If you cannot make BrowserStack Code Quality URL directly available to Github/Bitbucket (e.g. due to security constraints), you can use applications such as Ngrok to achieve this. To let BrowserStack Code Quality know about this configuration, you need to set up URL forwarding in BrowserStack Code Quality UI.
Steps:
- Go to admin section in BrowserStack Code Quality UI and select “URL forwarding” tab
- Fill in the “Forwarded URL” field with the configured public URL that is forwarded to BrowserStack Code Quality local URL.
Gated Commit
Overview
Gated Commit is an integration pattern that means the commit does not happens until a set of checks is passed against the code. It helps the developers to avoid breaking the code and prevents bad code from going into the integration branch. This should take place before committing changes to the Version Control System (VCS i.e. central server).
Installation Steps:
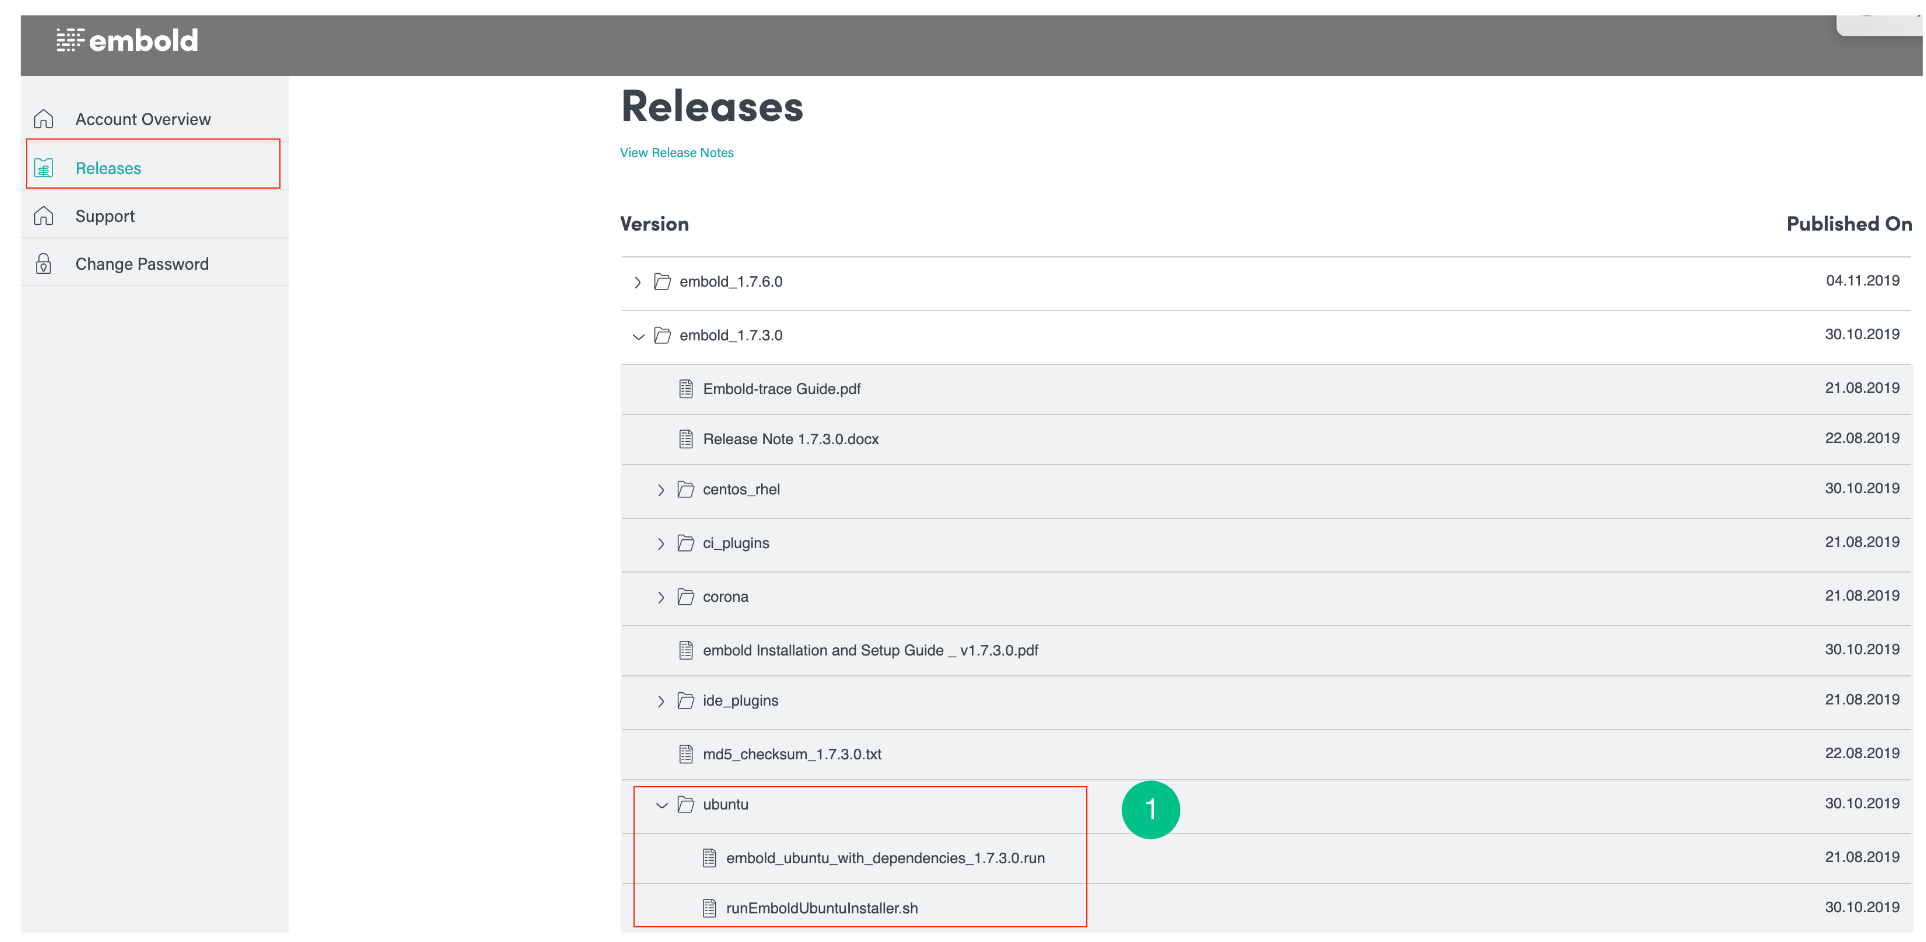
- Download the installer file from your Embold Account’s section > Releases tab. There will be one file with names similar to the following: ‘embold_ubuntu_with_dependencies_1.7.3.0.run’.
- Go to the Corona path $CORONA_HOME/coronacli/config/cli.properties and add Embold credentials in CLI properties file.
- Make sure that installer file ‘embold_ubuntu_with_dependencies_1.7.3.0.run’ has execution permission. To check the permissions of the installer file, run the following command in the terminal.
||
If the file does not have the execution permission, use the following command to grant the permission.sudo chmod 755 embold_ubuntu_with_dependencies_1.7.3.0.run - Copy the file from Corona folder to source base directory.
- For Git: Copy “commit-msg” from $CORONA_HOME/coronacli/config/commit-msg to baseDir/.git/hooks
- For SVN: Copy “pre-commit” file to svn/hooks/pre-commit (This pre-commit files should always be present on the server)
Check if commit-msg and pre-commit have execution permissions.
- Make the necessary code changes if required.
- Commit the changes done using the below command:
git commit -m "Committing changes"- If the commit is successful, no errors are displayed on the console.
- If the commit fails, the list of issues is displayed on the console.
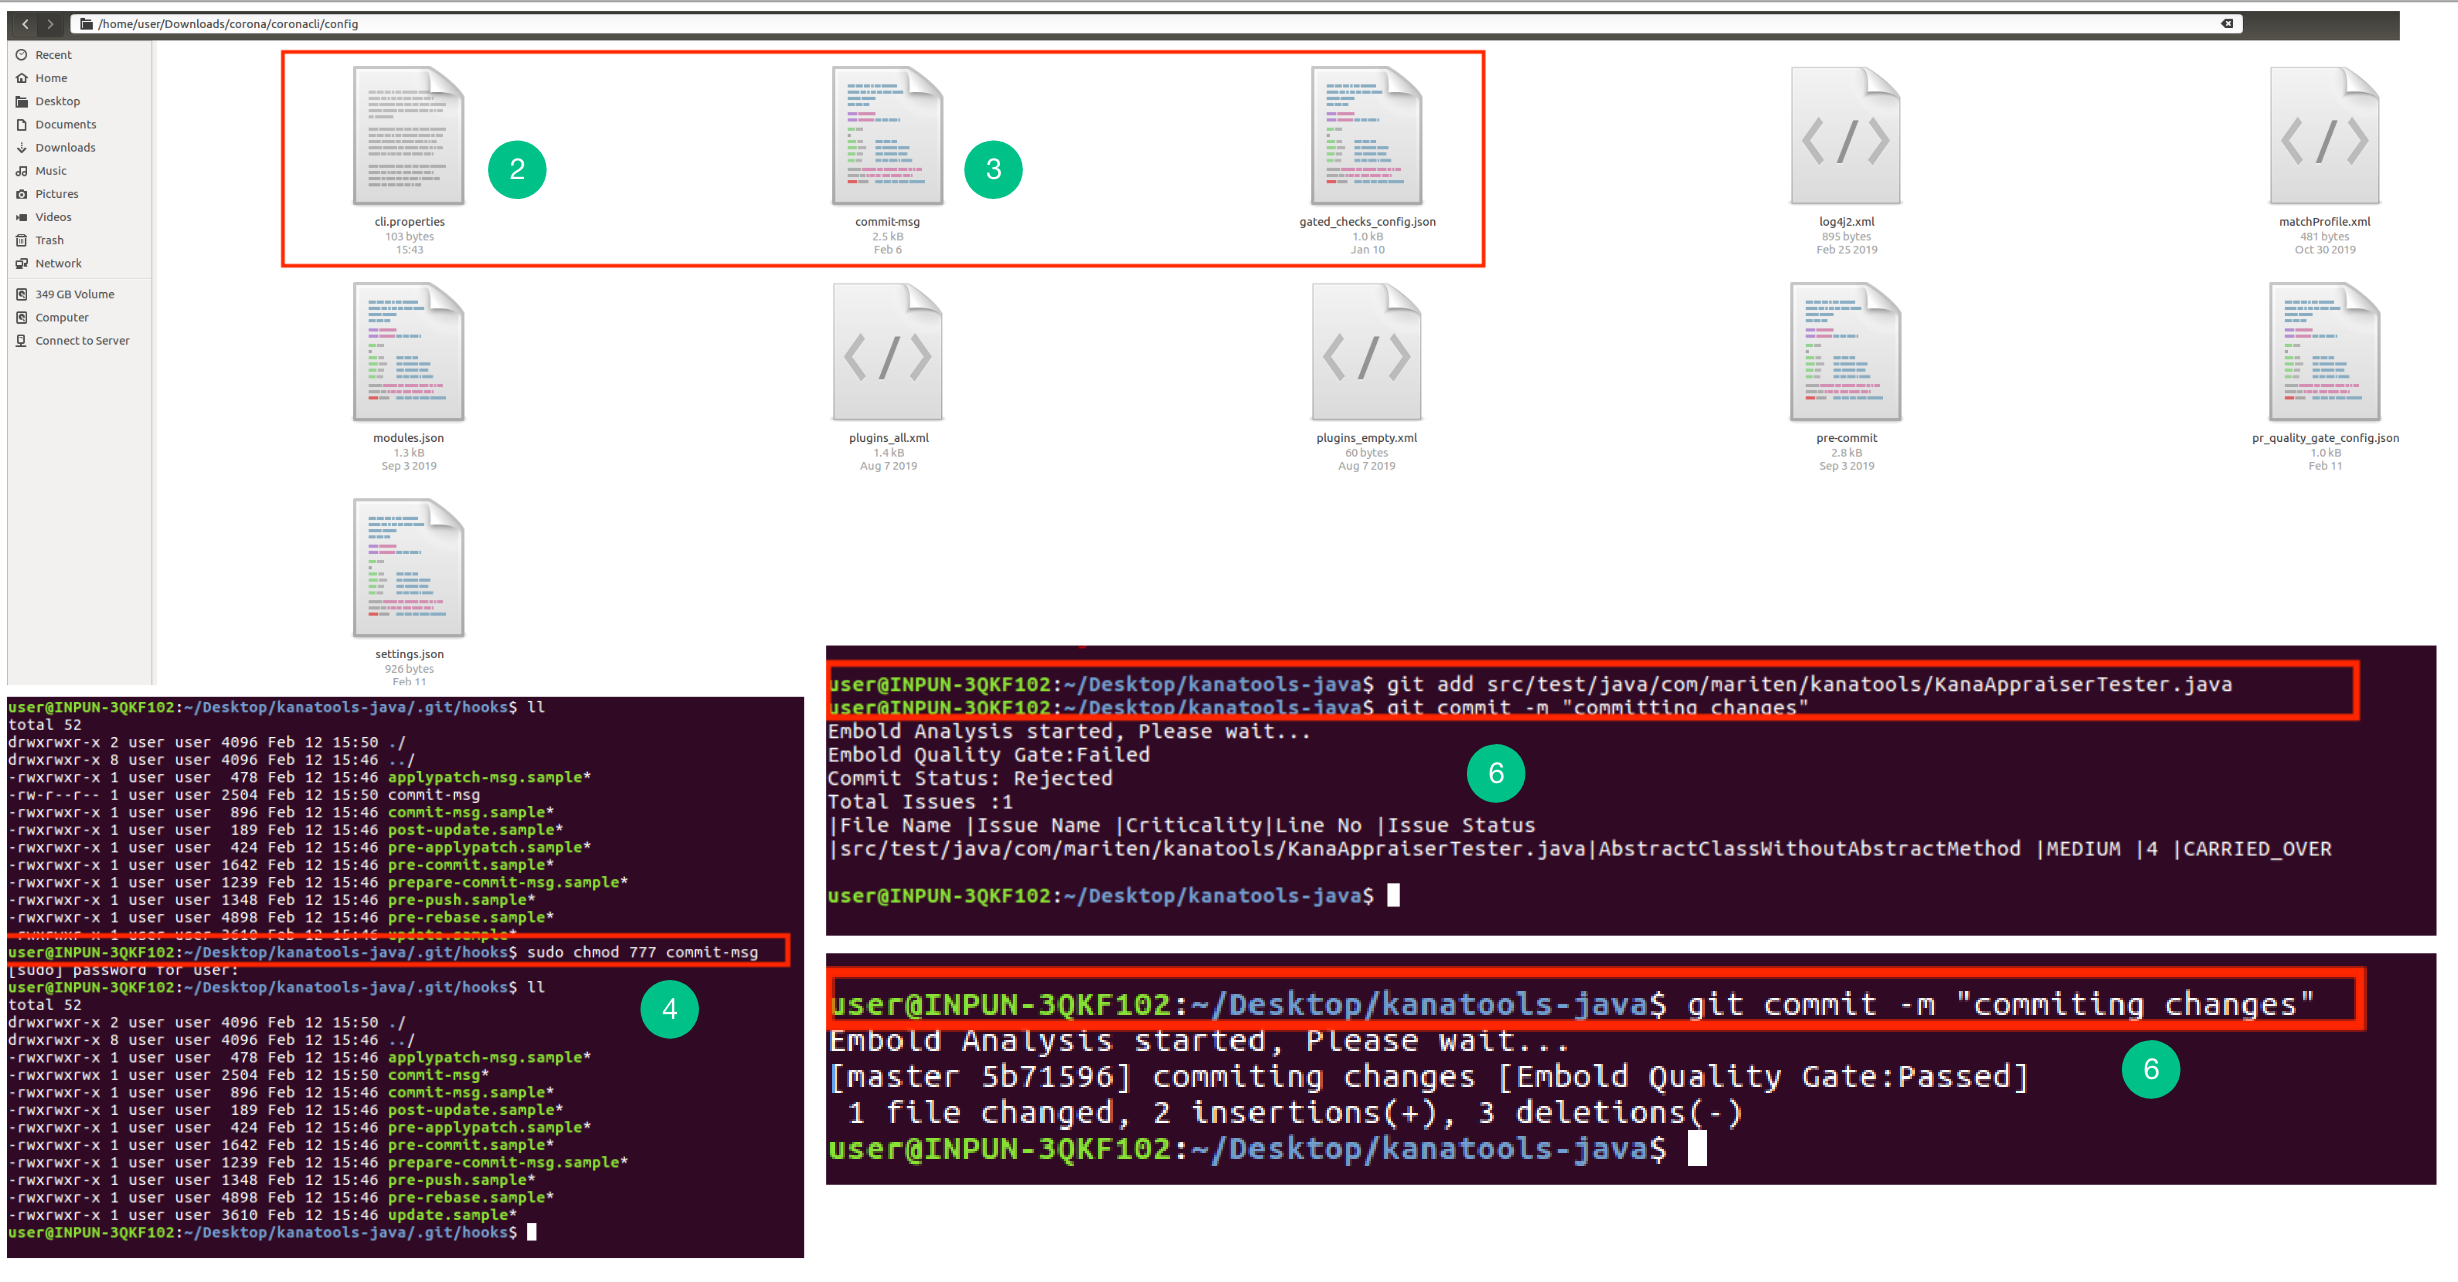
Embold supports gated commit for Git as well as SVN.
To know about how to install corona, please refer to this article.
What if you still want to commit?
Sometimes, the user may have to accidentally commit and push their code to the main branch. There are 2 ways through which a user can commit these changes:
- Force-commit: User may have to immediately commit the code changes due to any of the emergency condition. Embold analysis will be done and still, commit will not fail.
There may be a list of issues present while committing these changes.
Added issues will be attached to the commit-msg. - Below is the command for force-commit:
git commit -m "Committing changes embold --force-commit"
Required parameters:embold --force-commit
- Skip: Users may have to skip gated commit if bad code is present. Embold analysis will not be done. The commit-msg will be updated.
- Below is the command for skip:
git commit -m "Committing changes embold --skip"
Required parameters:embold --skip

Embold Configuration JSON
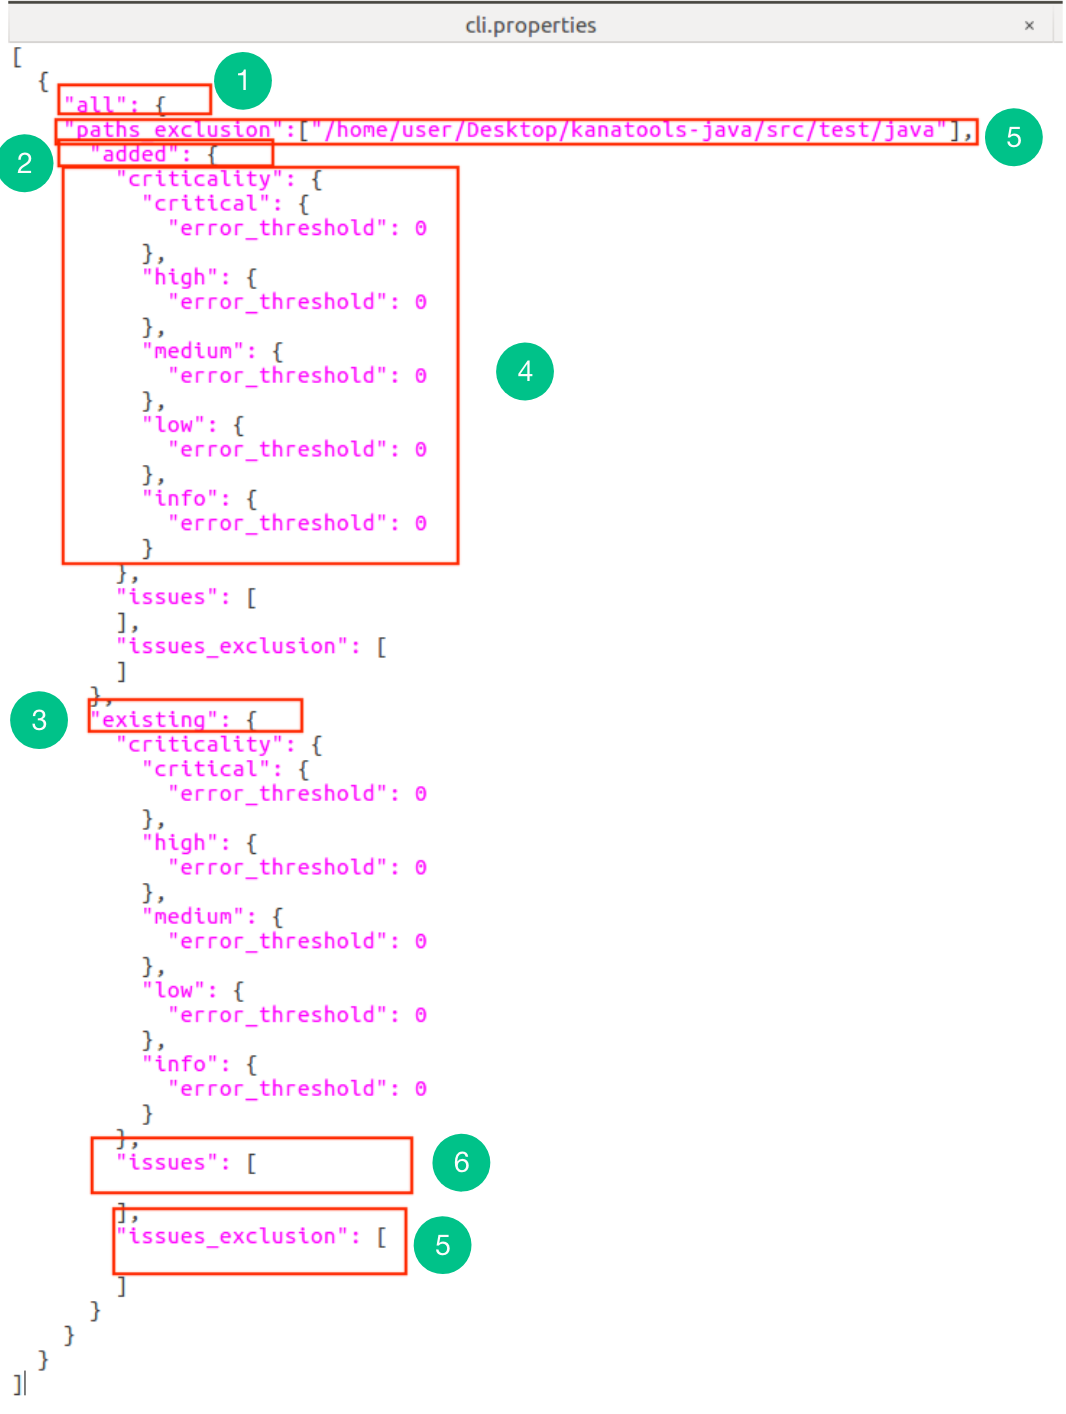
This configuration file contains the list of issues with its associated threshold values. Parameters such as path_exclusion, issues_exclusions and so on are mentioned in this JSON file.
The company organization will decide about the strictness of this JSON file. For e.g. Company can set their own rules/standards and customize this configuration file.
Below are the JSON fields :
all: This field contains a list of added and existing issues for all languages.added: This field displays all the newly added issue lists and based upon that criticality is decided.existing: This field displays the already added issue list. These issues can be carry forwarded.criticality: This field mentions the high, medium and low criticality. The threshold values are decided by the company organization depending on their requirements.- If the threshold value is o or more, gated commit will fail if it exceeds the given threshold value.
- If the threshold value is -1, issues will be skipped.
paths_exclusionandissues_exclusion: These fields contain the list of paths and issues that need to be excluded.- A list of issues that needs to be included in the code is mentioned under the field
issues.
