Execute the following steps if you are existing Embold docker version is lower than 1.9.26.0.
Important: RDBMS (Postgres) has been separated from Docker. You can connect to your own RDBMS. Ensure that the Postgres version is >= 13.
Step 1: Backup using Postgres 16
- Create a Backup Directory
- Create a backup directory under the mapped
gamma_datafolder on your host machine. You can find the mapped path in the existing Docker command forgamma_data. For example
- Create a backup directory under the mapped
-v /home/${USER}/BrowserStackCodeQuality/gamma_data:/opt/gamma_data
- Run the following command to create the backup directory:
mkdir gamma_data/backup
- Take a Backup
- Execute the following Docker command to take a backup of the
coronaandgamma
- Execute the following Docker command to take a backup of the
docker exec -it BrowserStackCodeQuality sh -c "pg_dump --no-owner -U postgres corona -f /opt/gamma_data/backup/corona.sql && pg_dump --no-owner -U postgres gamma -f /opt/gamma_data/backup/gamma.sql"
Step 2: Restore the Database. You can connect to your RDBMS or use a Postgres Docker container. Choose one of the following options to connect to the database:
- Option 1: Use an external database
To restore a database on your RDBMS, follow these steps:- Create the databases
- Execute the following command to create the
coronaandgammadatabases. ReplaceYOUR_DB_HOSTandYOUR_DB_USERNAMEwith your actual database host and username.
- Execute the following command to create the
- Create the databases
docker exec -it BrowserStackCodeQuality sh -c 'su - postgres -c "psql -h YOUR_DB_HOST -U YOUR_DB_USERNAME -d postgres -c \"CREATE DATABASE corona;\" && psql -h YOUR_DB_HOST -U YOUR_DB_USERNAME -d postgres -c \"CREATE DATABASE gamma;\""'
- Enter the database password (if prompted).
- Restore the Database
- Execute the following command to restore the
coronaandgammadatabases from backup files. ReplaceYOUR_DB_HOSTandYOUR_DB_USERNAMEwith your actual database host and username.
- Execute the following command to restore the
docker exec -it BrowserStackCodeQuality sh -c 'su - postgres -c "psql -h YOUR_DB_HOST -U YOUR_DB_USERNAME -d corona -f /opt/gamma_data/backup/corona.sql && psql -h YOUR_DB_HOST -U YOUR_DB_USERNAME -d gamma -f /opt/gamma_data/backup/gamma.sql"'
- Enter the database password (if prompted).
- Remove the Existing Embold Container
docker rm -f BrowserStackCodeQuality
- Option 2: Using a Postgres Docker Container
- Run Postgres Container
- Execute the following command to run a Postgres container:
- Run Postgres Container
docker run -d --rm \
  --name BrowserStackCodeQuality-DB \
  -e POSTGRES_USER=postgres \
  -e POSTGRES_PASSWORD=postgres \
  -v /home/${USER}/BrowserStackCodeQuality/gamma_pg_data:/var/lib/postgresql/data \
  -v /home/${USER}/BrowserStackCodeQuality/gamma_data/backup:/backup \
  postgres:16.3-alpine
- Create the databases
- Execute the following command to create the
coronaandgammadatabases:
- Execute the following command to create the
docker exec -it BrowserStackCodeQuality-DB sh -c 'su - postgres -c "psql -U postgres -c \"CREATE DATABASE corona;\" && psql -U postgres -c \"CREATE DATABASE gamma;\""'
- Restore the Database
- Execute the following command to restore the
coronaandgammadatabases:
- Execute the following command to restore the
docker exec -it BrowserStackCodeQuality-DB sh -c 'su - postgres -c "psql -U postgres -d corona -f /backup/corona.sql && psql -U postgres -d gamma -f /backup/gamma.sql"'
- The database restoration is now complete.
- Remove the DB and Existing Embold Container
docker rm -f BrowserStackCodeQuality-DB
docker rm -f BrowserStackCodeQuality
Step 3: Final step: Prepare and Run Docker-Compose
- Execute the following commands to create a temporary directory and set the appropriate permissions:
mkdir gamma_data/tmp
chown -R 1001:1001 gamma_data/ logs/
- Run Docker-Compose
If using an external PostgreSQL, skip thedbservice and configure the database settings in theappservice accordingly.
version: '2'
services:
  db:
    image: "postgres:16.3-alpine"
    container_name: BrowserStackCodeQuality-DB
    environment:
      POSTGRES_USER: postgres
      POSTGRES_PASSWORD: postgres
    ports:
     - "5432:5432"
    healthcheck:
      test: ["CMD-SHELL", "pg_isready -U postgres"]
      interval: 10s
      timeout: 5s
      retries: 5
    volumes:
      - /home/${USER}/BrowserStackCodeQuality/gamma_pg_data:/var/lib/postgresql/data
  app:
    image: "browserstack/code-quality:1.9.33.0"
    tty: true
    container_name: BrowserStackCodeQuality
    environment:
    - ACCEPT_EULA=Y
    - gamma_ui_public_host=http://locahost:3000
    - RISK_XMX=-Xmx1024m
    - ANALYSER_XMX=-Xmx6072m
    - PGHOST=db
    - PGPORT=5432
    - PGUSER=postgres
    - PGPASSWORD=postgres
    - GAMMA_DATABASE=gamma
    - ANALYTICS_DATABASE=corona
    depends_on:
      db:
        condition: service_healthy
    deploy:
      resources:
        limits:
          memory: 10G
    ports:
     - "3000:3000"
    volumes:
     - /home/${USER}/BrowserStackCodeQuality/gamma_data:/opt/gamma_data
     - /home/${USER}/BrowserStackCodeQuality/logs:/opt/gamma/logs
     - /home/${USER}/BrowserStackCodeQuality/gamma_data/tmp:/tmp
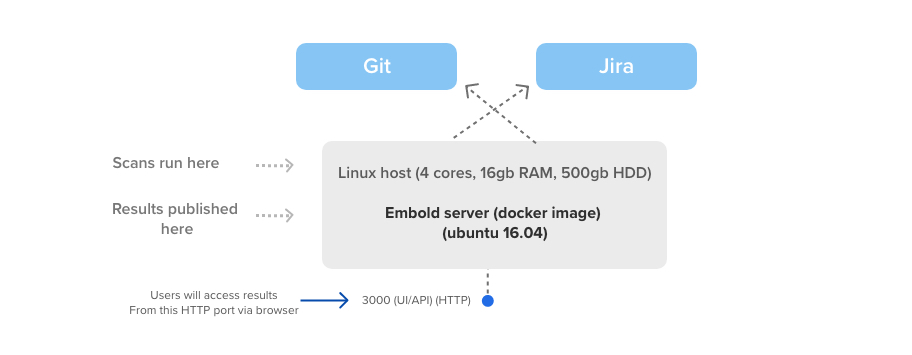
Reference diagram
Below illustration helps you understand how the scans work on Code Quality Server.

