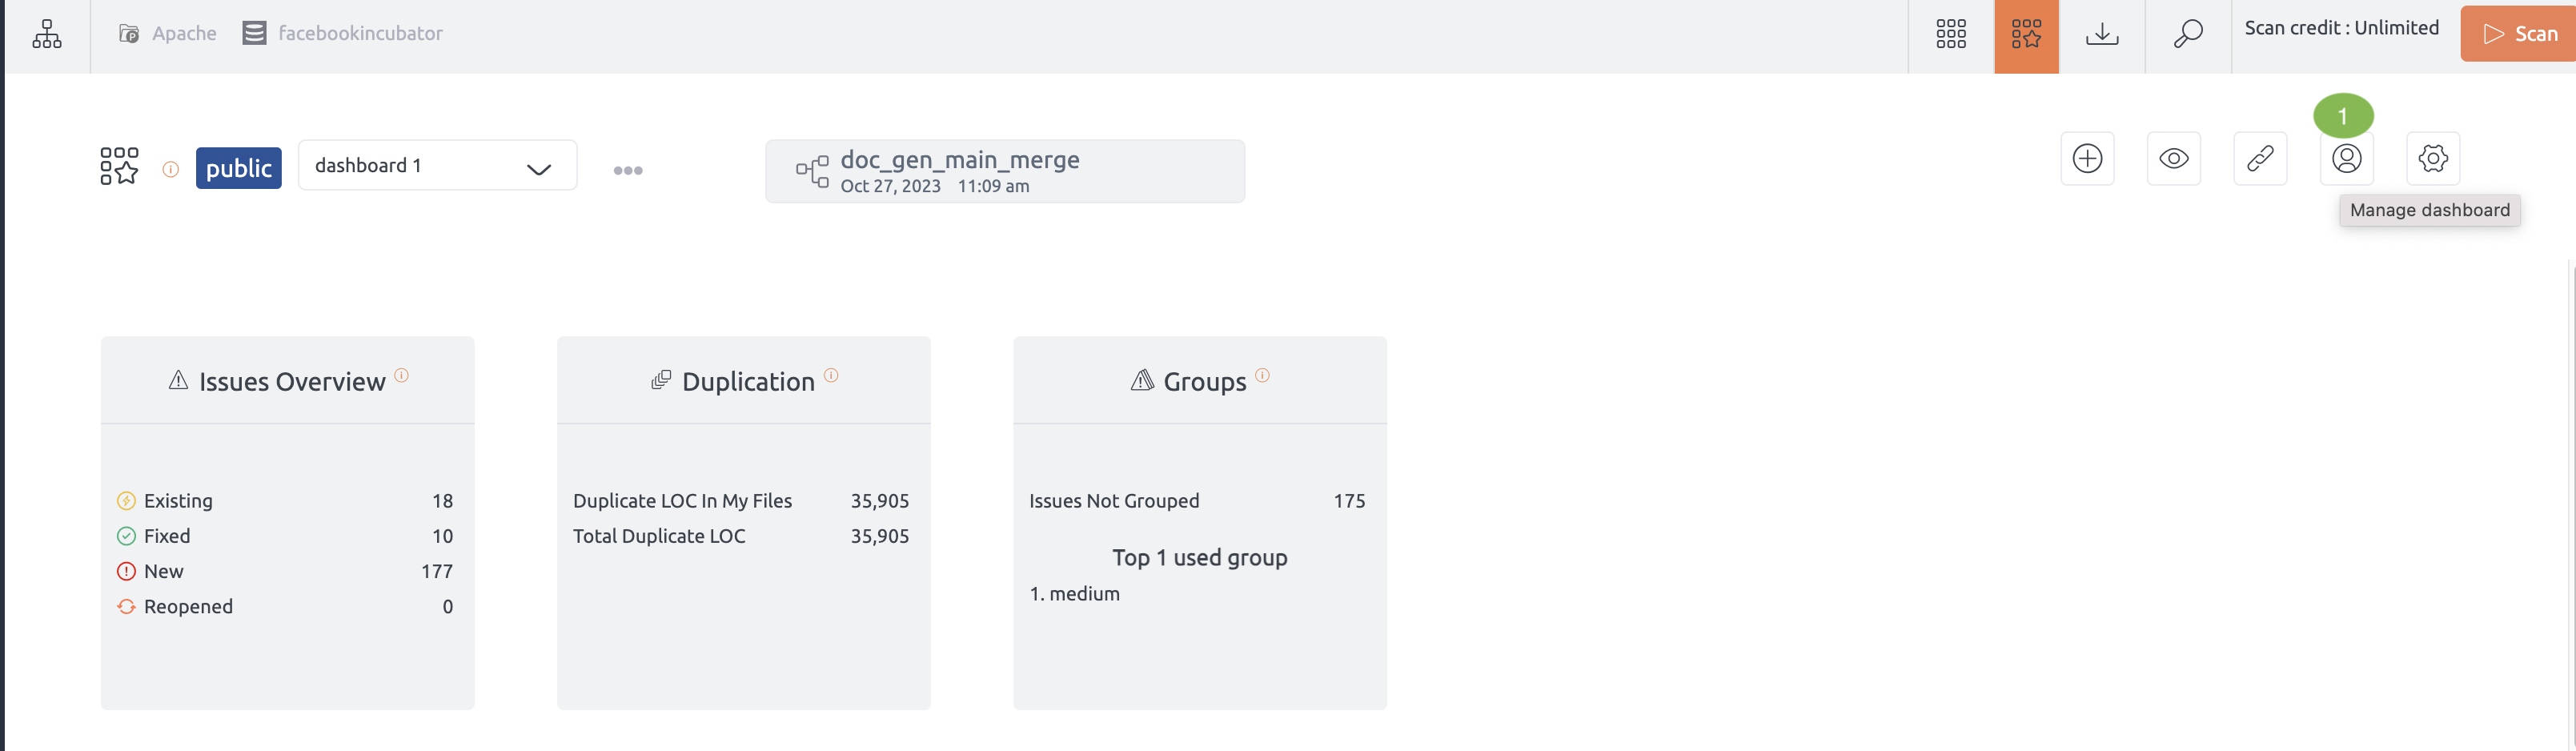
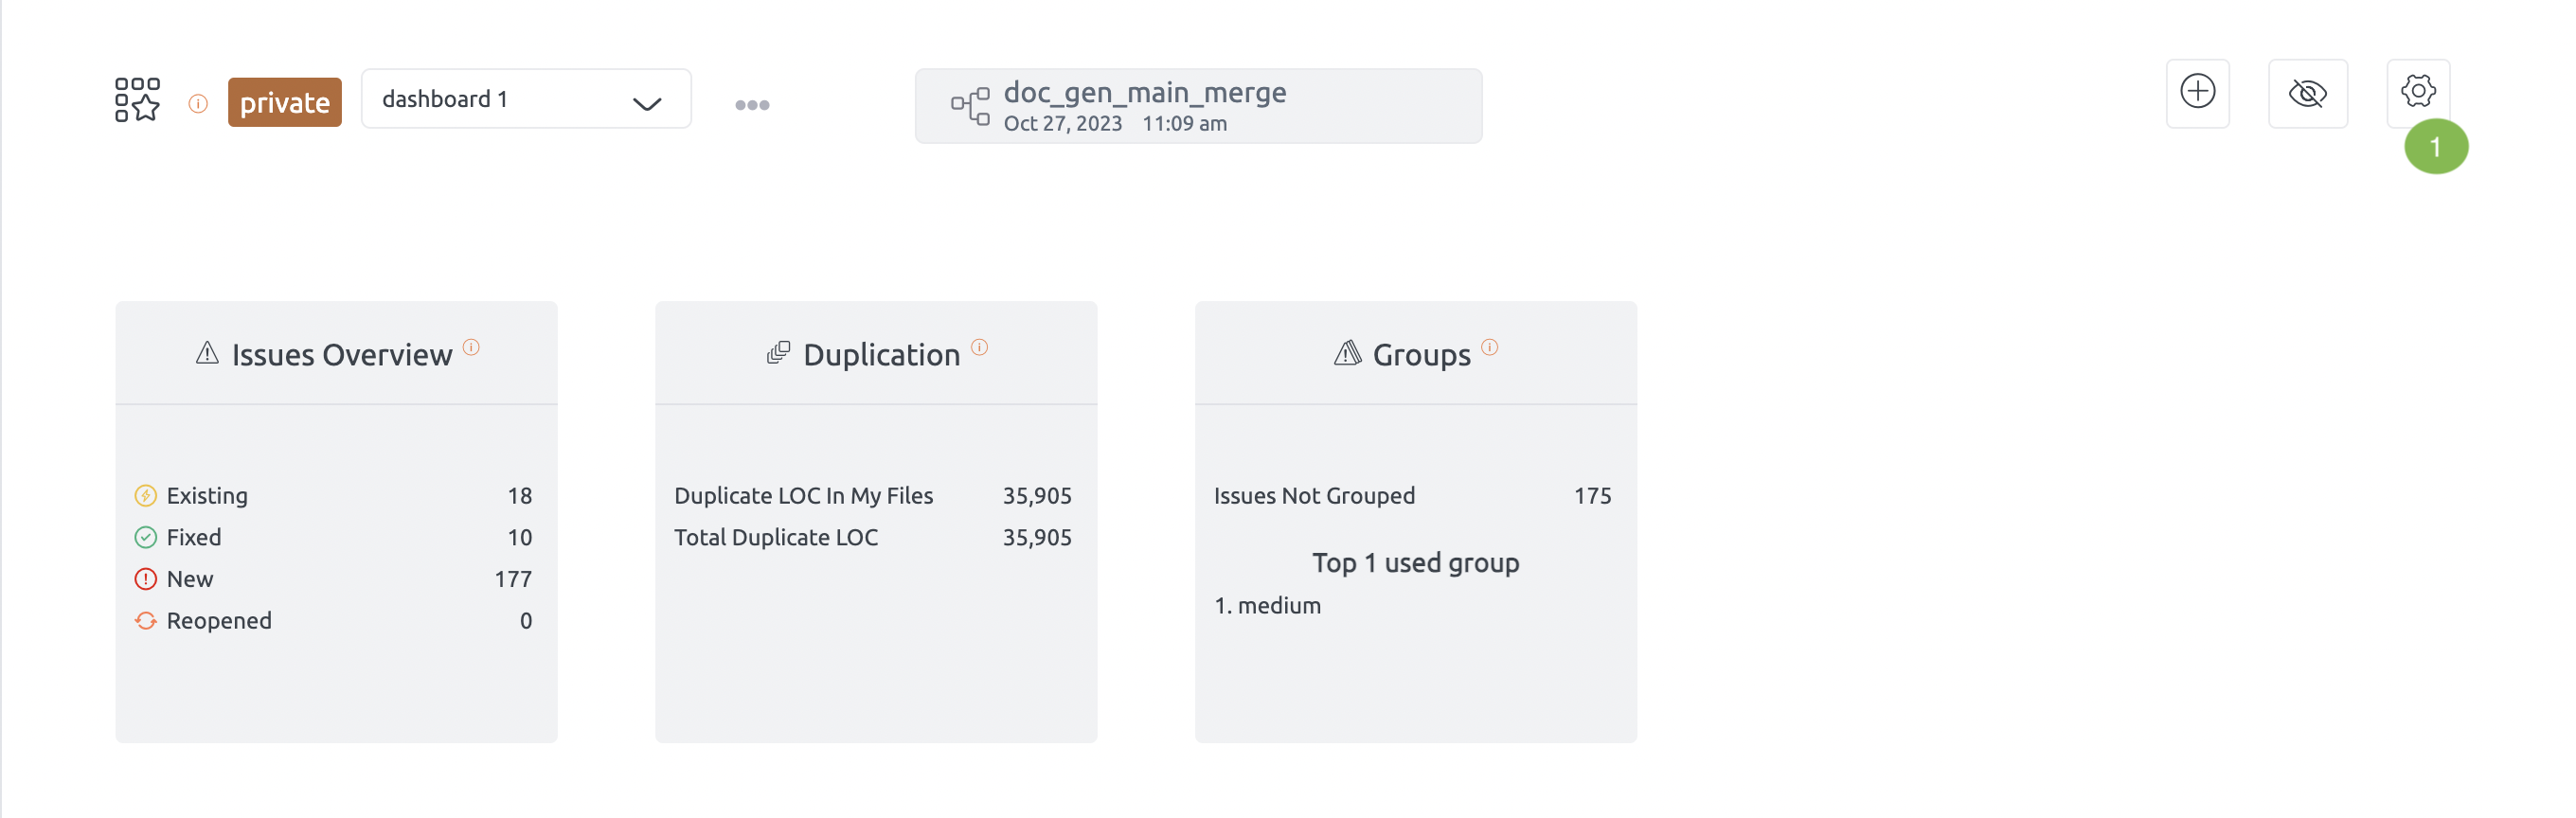
Team dashboard
The team dashboard feature enables users to create and manage dashboards collaboratively. These dashboards can be either private or shared, facilitating efficient issue tracking and team collaboration
Explorer users are restricted from creating shared dashboards.
Dashboard Creation and Customization
- Create a Dashboard: Users can create private or shared dashboards to facilitate efficient issue tracking and team collaboration. Explorer users can only create private dashboards.
- Customize Your Dashboard: Add widgets and organize the dashboard’s content to suit your needs and preferences.
Managing Dashboards
- Selecting file/module for dashboard: Select specific files or modules to include in your dashboard, enabling focused issue tracking and efficient project monitoring.
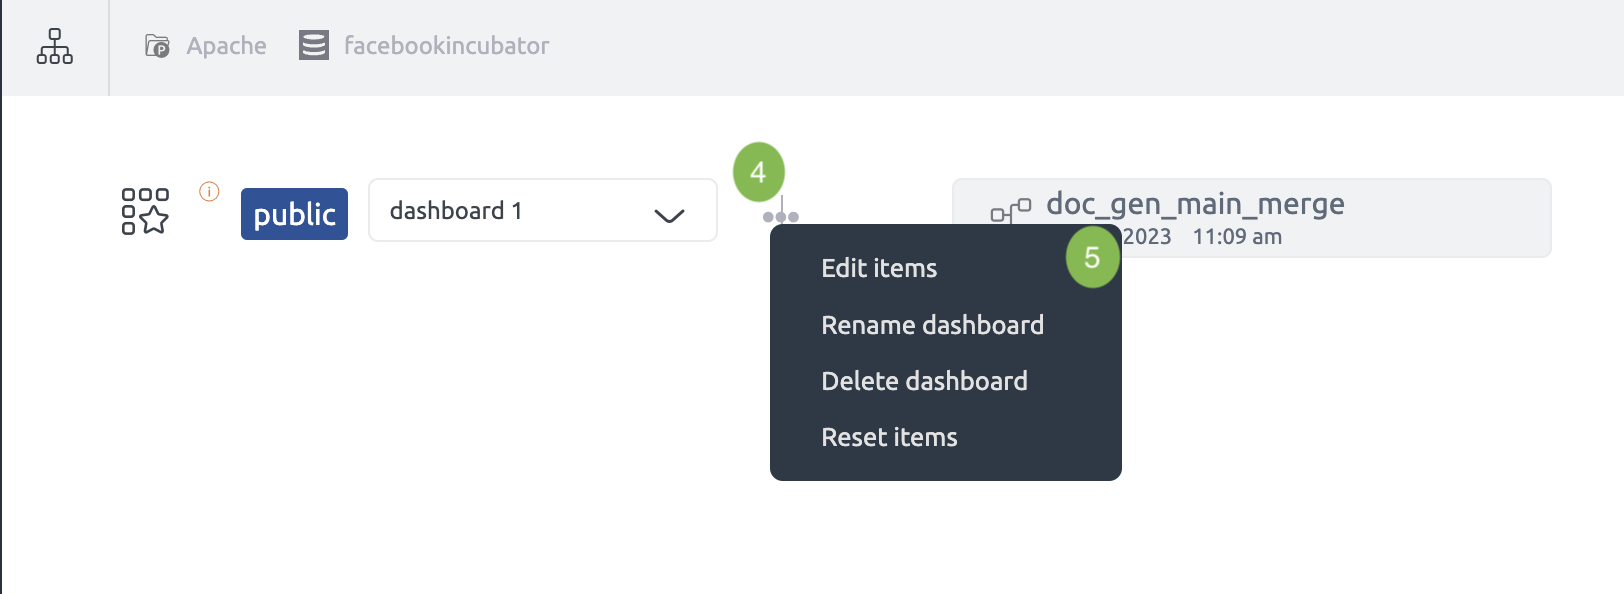
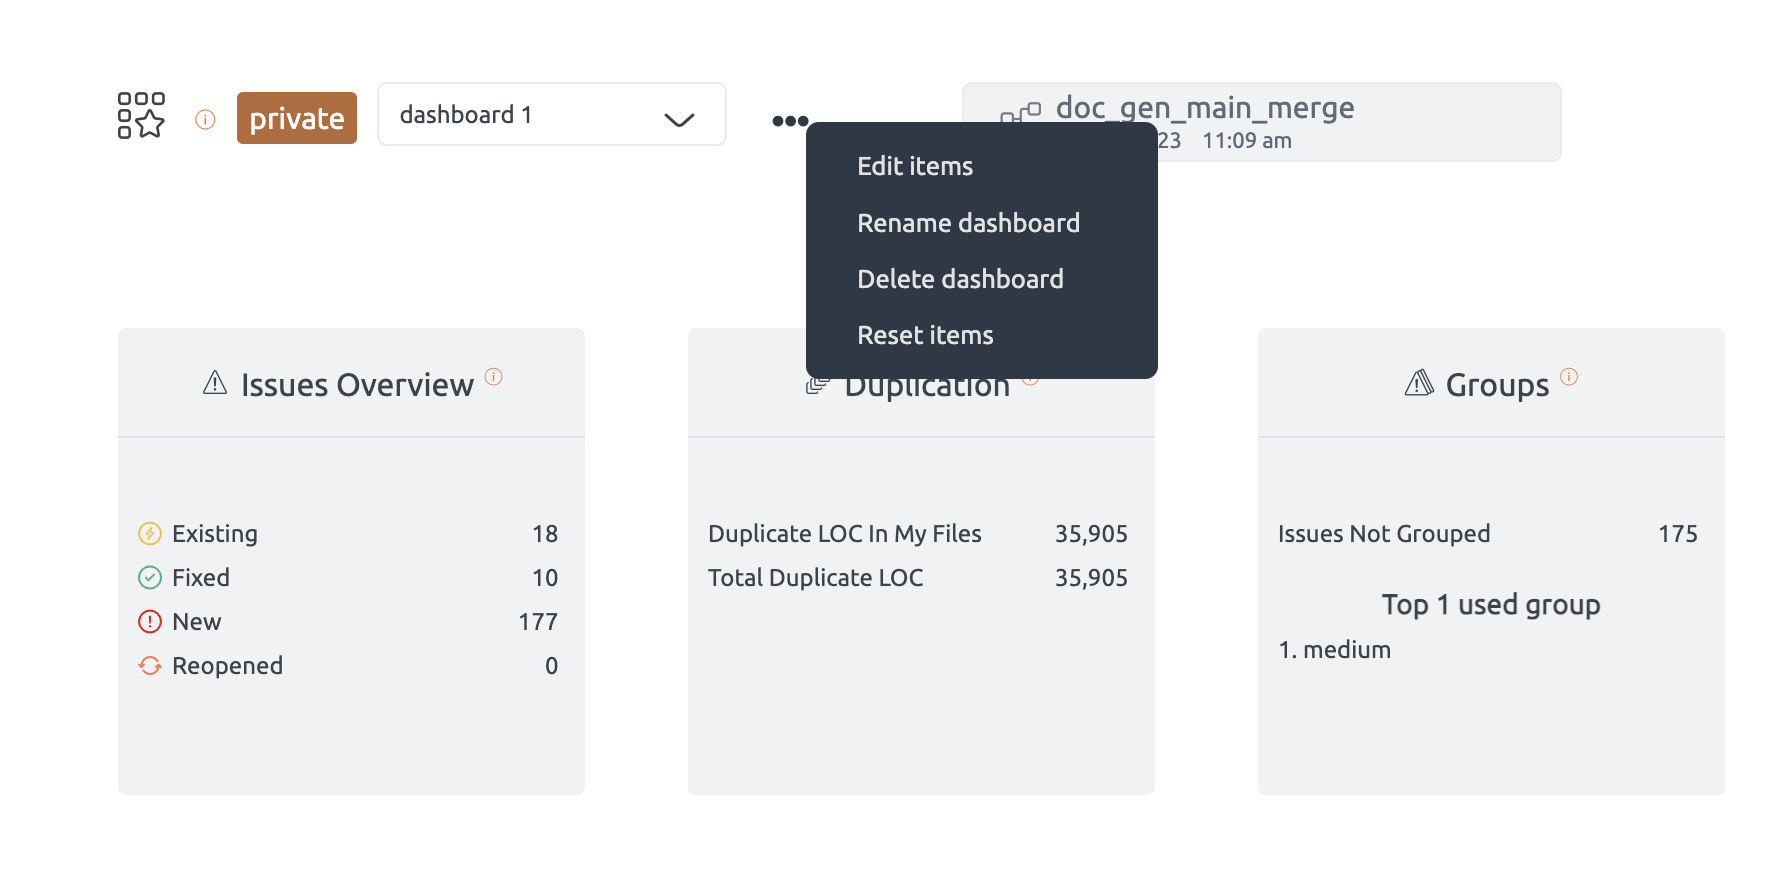
- Edit and Rename Dashboards: Modify existing dashboards to update views and content, and rename dashboards to keep them uniquely identifiable.
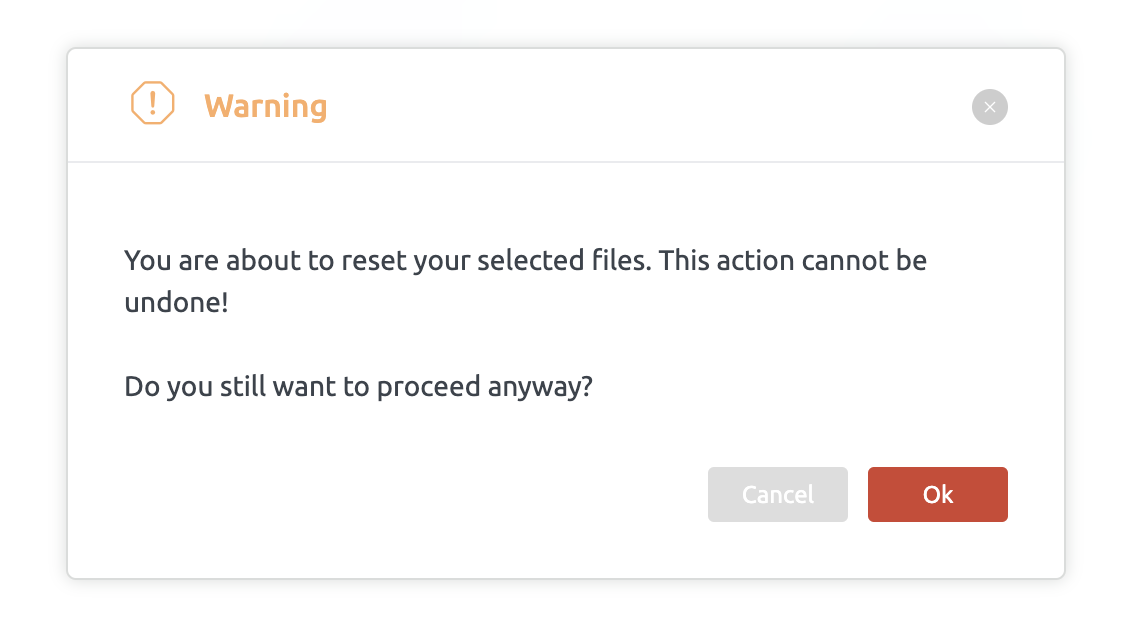
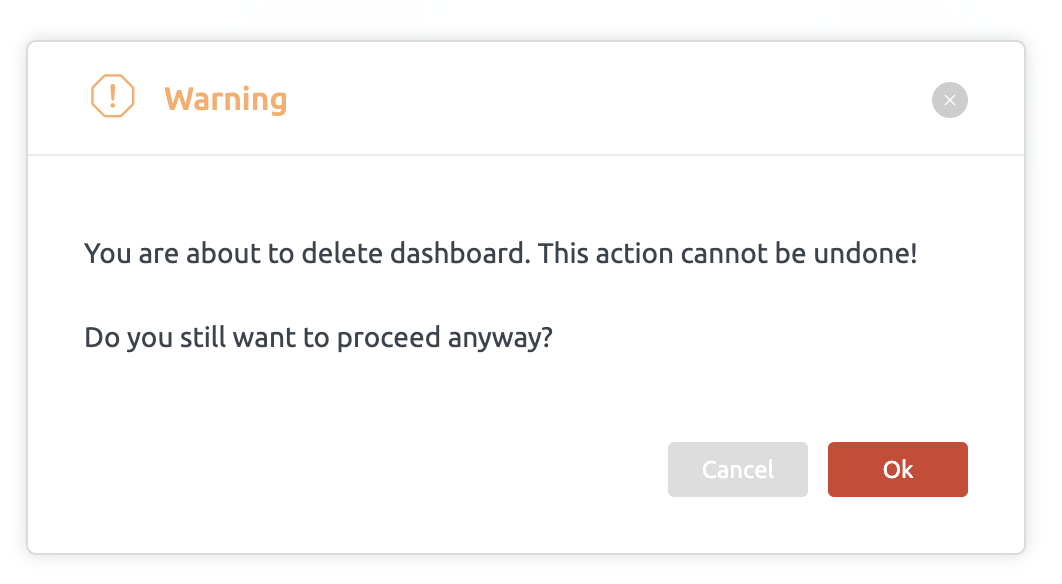
- Reset and Delete Dashboards: Clear all starred items in a dashboard with the reset function, or completely remove a dashboard that is no longer needed.
Access and Permissions
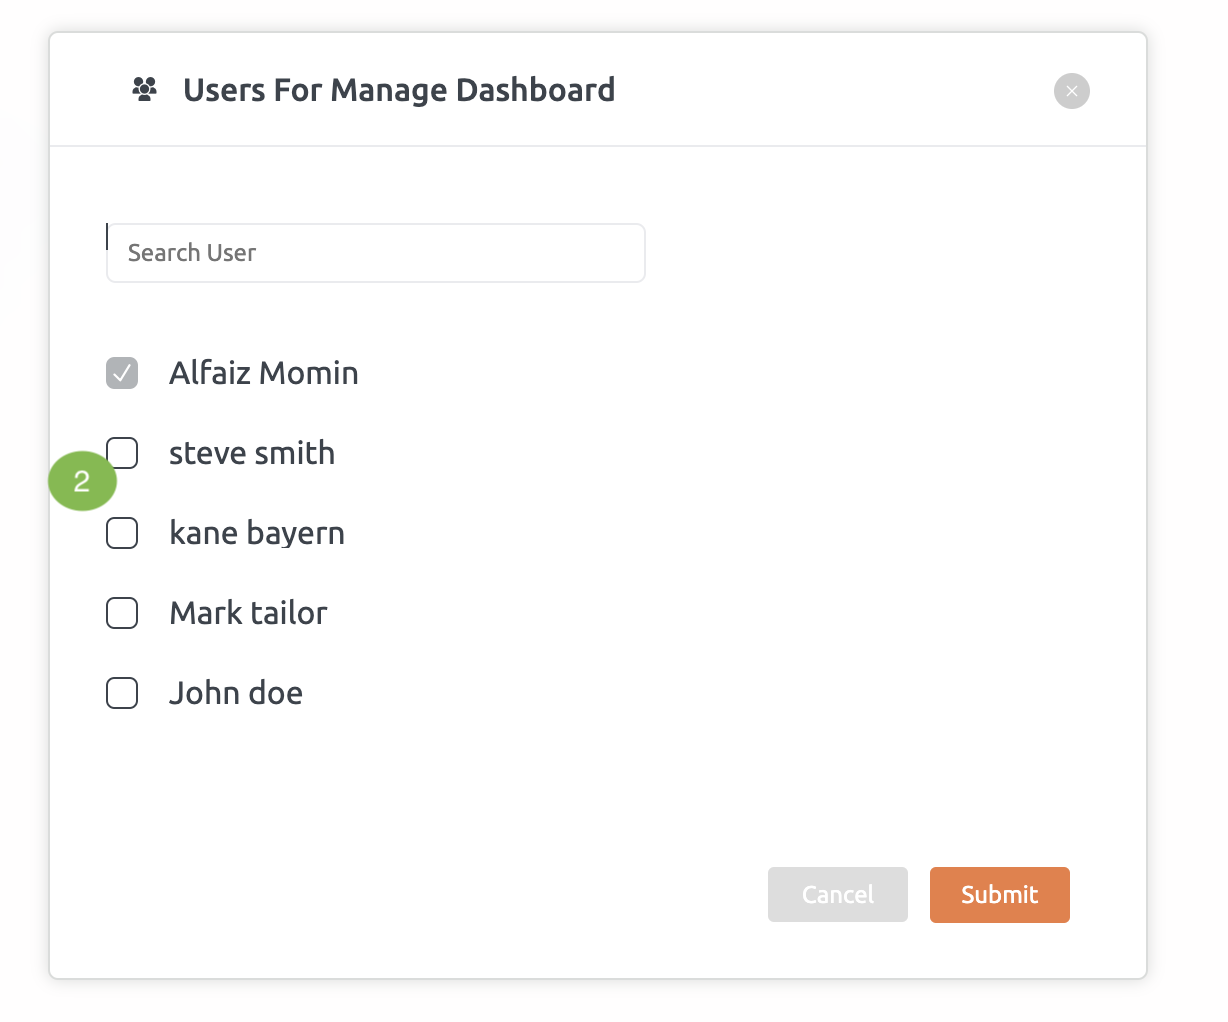
- Control Access: Manage who can edit, rename, delete, reset, and share each dashboard to maintain proper access control.
- Set Privacy Settings: Make dashboards private so only you can see them, or public so they are visible to all users with repository access.
Using Dashboards on the Issue Page
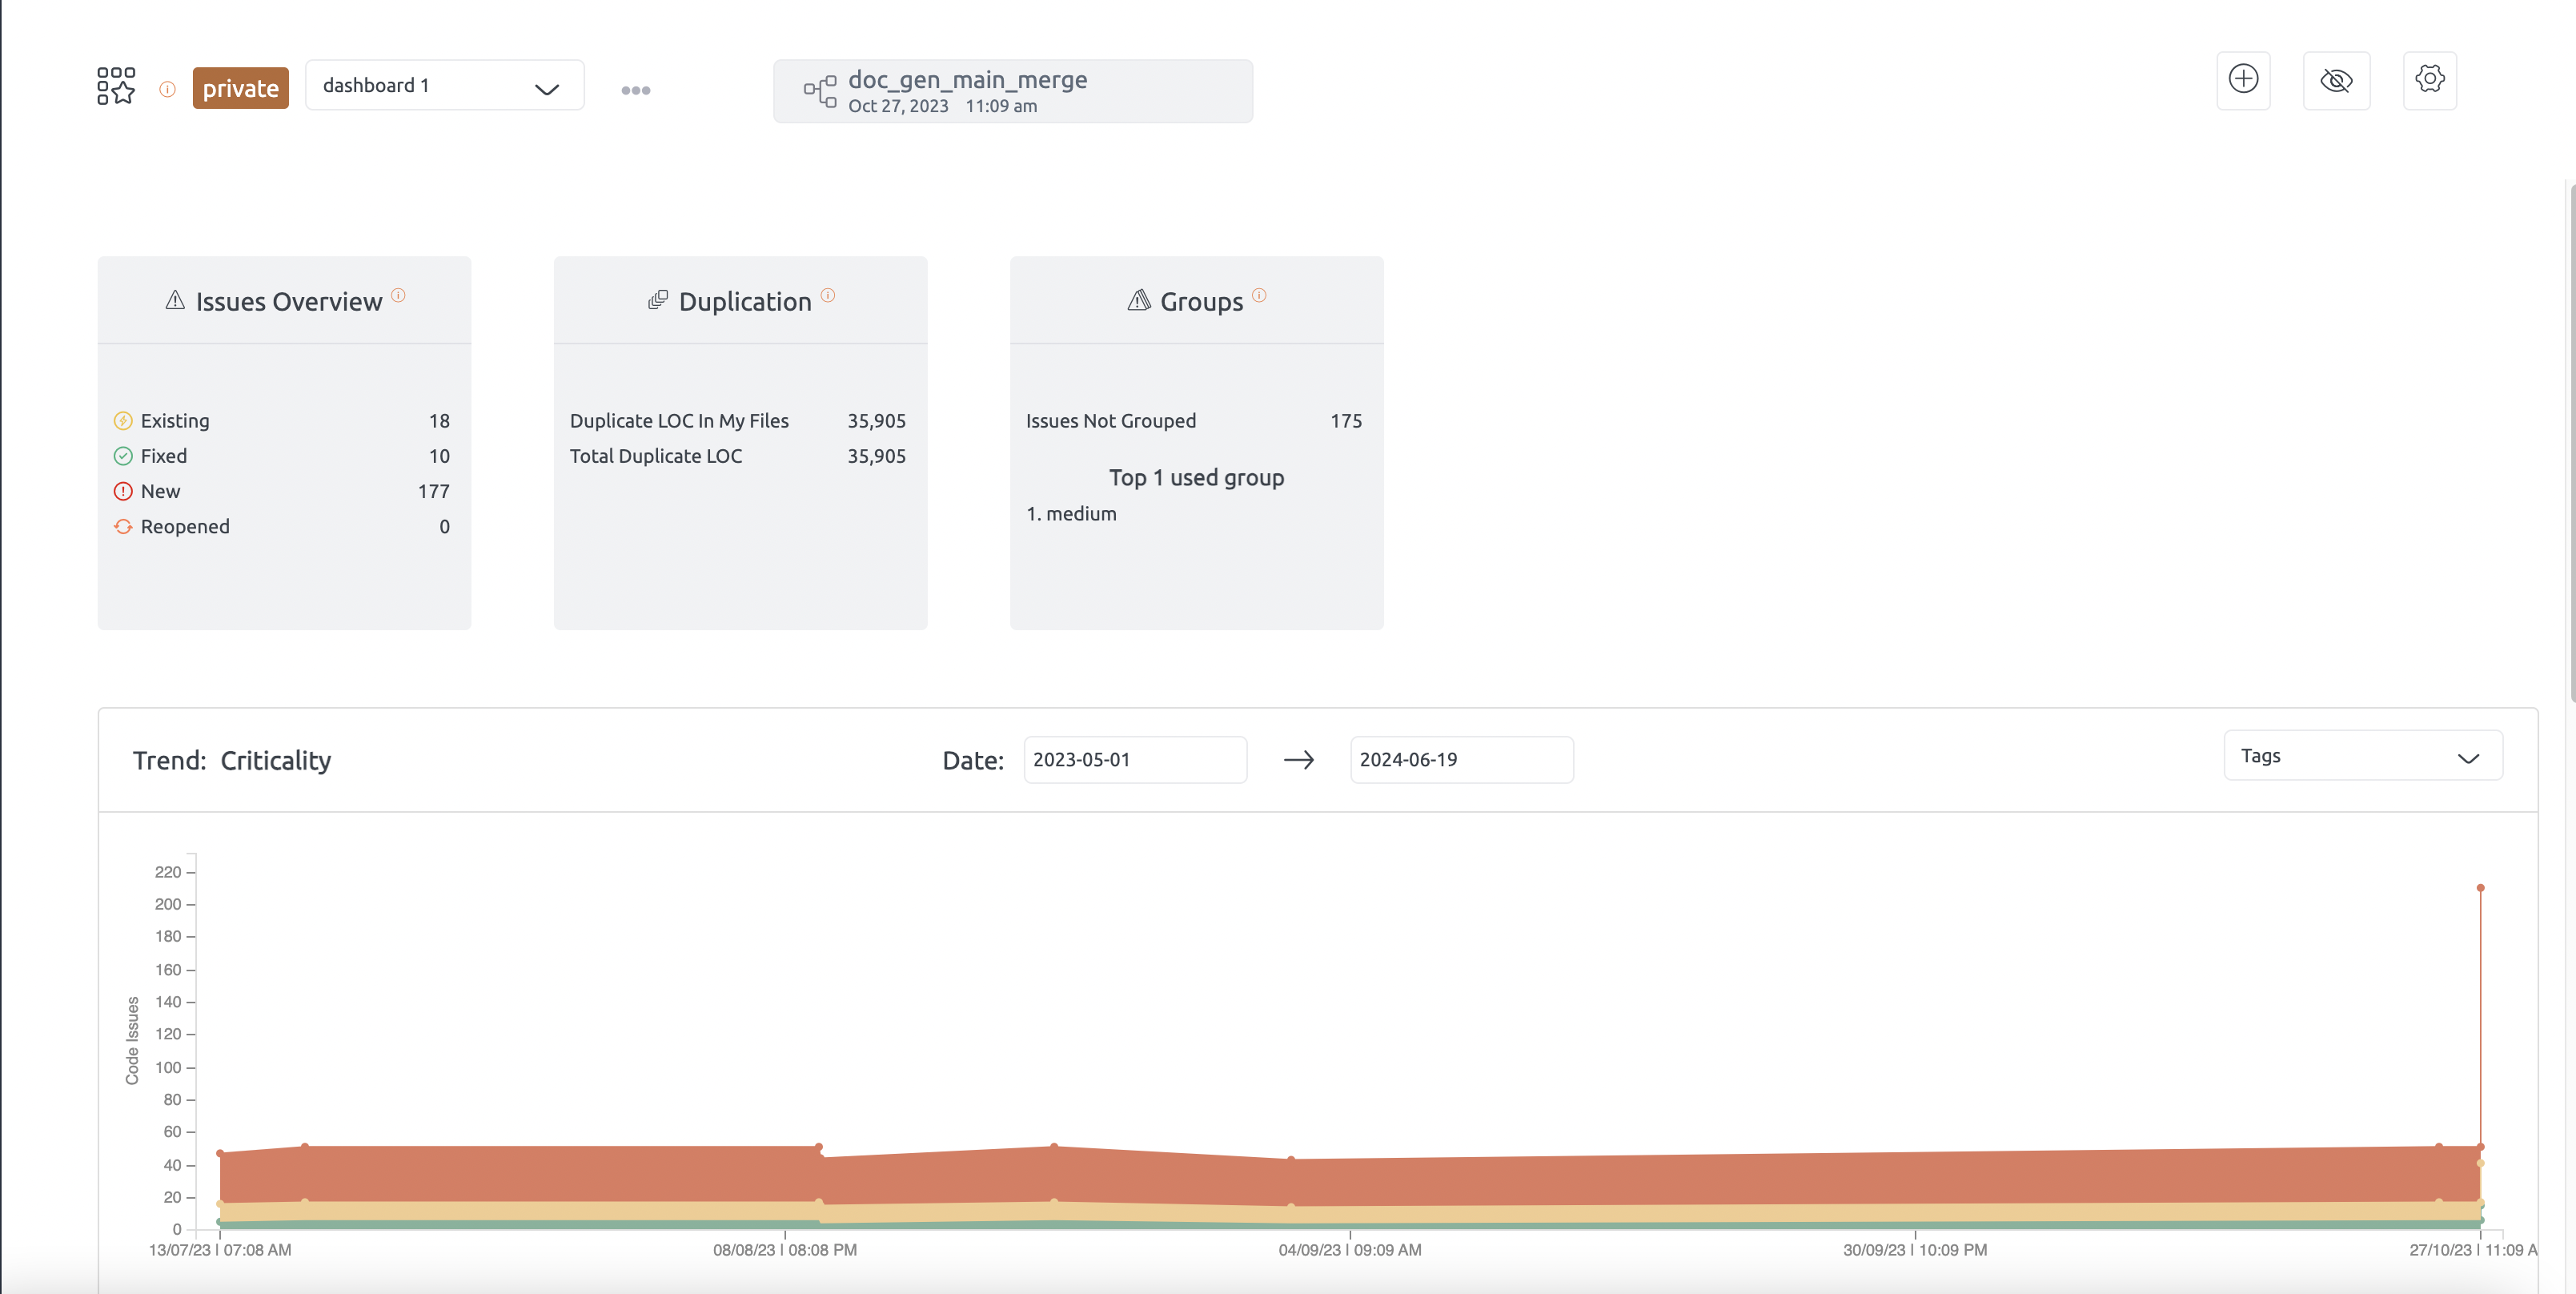
- Filter Issues: Use the dashboards to filter and view specific issues on the issue list page, streamlining issue tracking and management.
Pinned Snapshots Enhancement for MyDashboard Trend View
The Pinned Snapshots Enhancement improves the MyDashboard Trend View by focusing exclusively on pinned snapshots, providing a more customised and relevant data visualisation experience.

Feature Highlights:
- Data Based on Pinned Snapshots:
The trend view now displays metrics and trends derived solely from pinned snapshots, ensuring that users focus on the most important and curated data points. - Clear Identification of Pinned Snapshots:
Pinned snapshots are prominently highlighted in the trend view, making it easy for users to differentiate them from other snapshots and understand their significance in the overall analysis. - Enhanced Dashboard Integration:
The updated trend view seamlessly integrates with the existing MyDashboard layout, preserving the familiar user interface while offering enhanced functionality.
Benefits:
- Provides a tailored view of trends, focusing on snapshots that matter most to the user.
- Simplifies analysis by eliminating distractions from non-pinned data.
- Improves clarity and decision-making with highlighted pinned snapshots.
This enhancement ensures that the MyDashboard Trend View becomes a more effective tool for tracking and analysing key performance metrics tied to specific snapshots of interest.
Commenting on Snapshots
The Comment on Snapshot feature allows users to enhance the context and usability of any snapshot by adding comments and custom names. This functionality is designed to provide better organization and clarity for all snapshots, whether pinned or not.
Benefits:
- Adds meaningful context to snapshots, making them easier to understand and reference.
- Improves organization and navigation, especially in environments with multiple snapshots.
- Facilitates collaboration by allowing team members to understand the significance of each snapshot at a glance.
This feature enhances snapshot management by providing a more flexible and detailed way to organize and communicate information about snapshots.
Creating a Dashboard
Navigate to the My Dashboard Page
- Starting Point: Begin by navigating to the “My Dashboard” page within the application.
Initiating Dashboard Creation
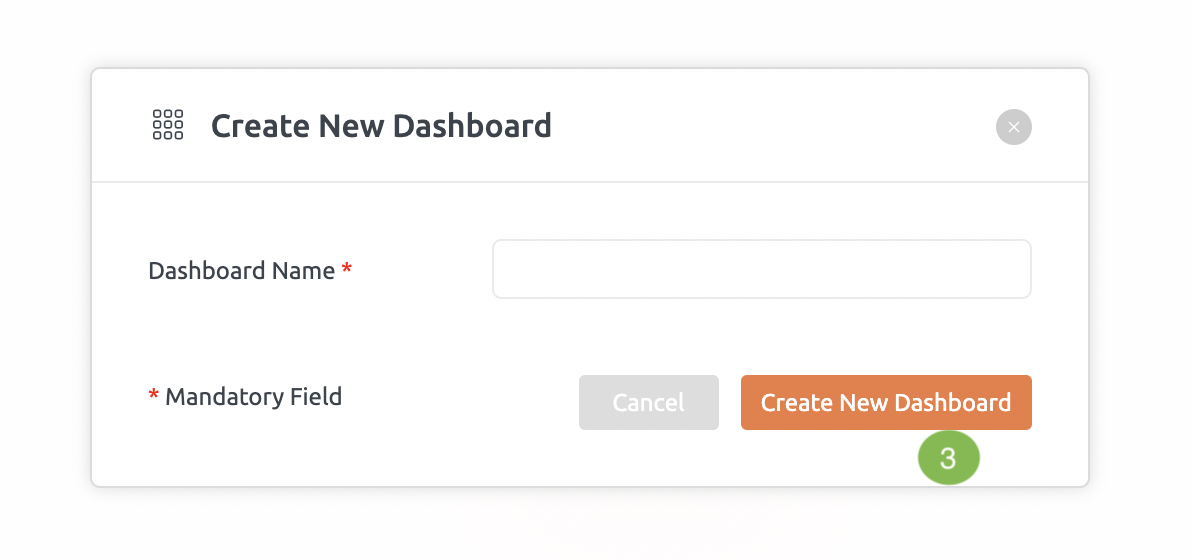
- If No Dashboard Exists Yet:
- Identify: Look for a button create new dashboard.
- Action: Click on the “Create New Dashboard” button.
- Creating a New Dashboard:
- Popup Prompt: After clicking “Create New Dashboard”, a popup will appear.
- Enter Name: Enter a unique name for your new dashboard in the popup.
- Uniqueness: Ensure the dashboard name is unique within the repository context.

Dashboard Management
Dashboard Management involves selecting files/modules for focused tracking, editing to modify content, renaming for clarity, resetting to clear settings, deleting to remove entirely, setting privacy preferences, customizing widget views, and maintaining an active dashboard for seamless navigation.
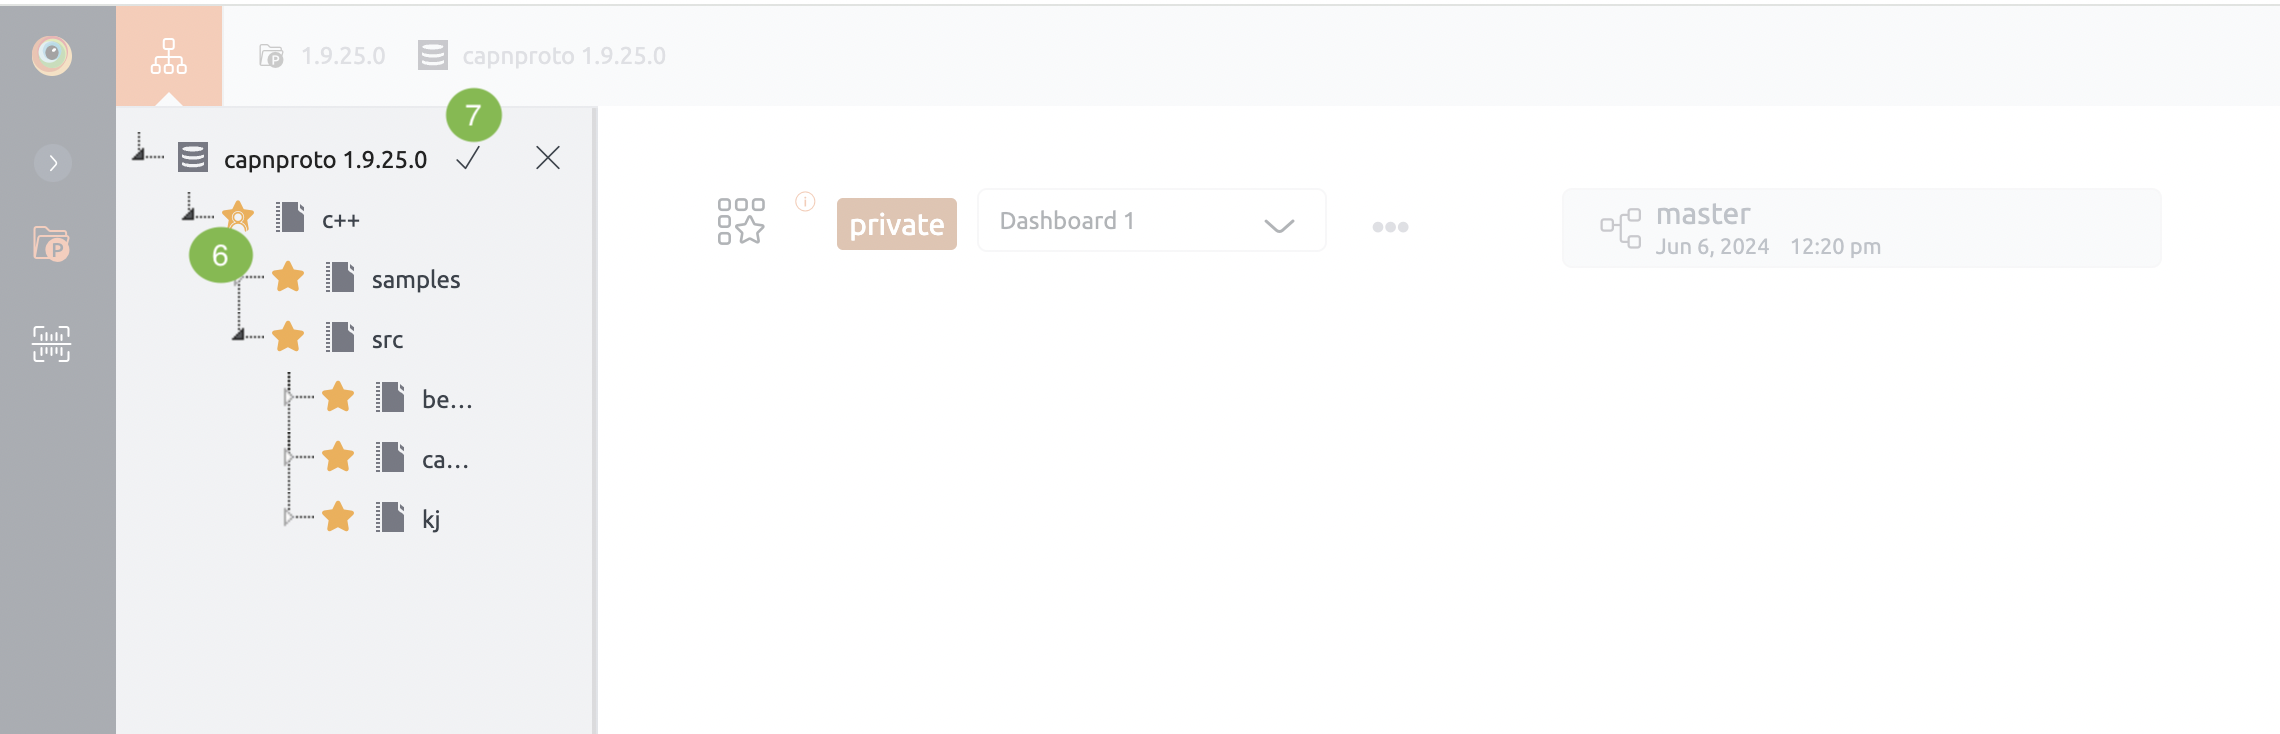
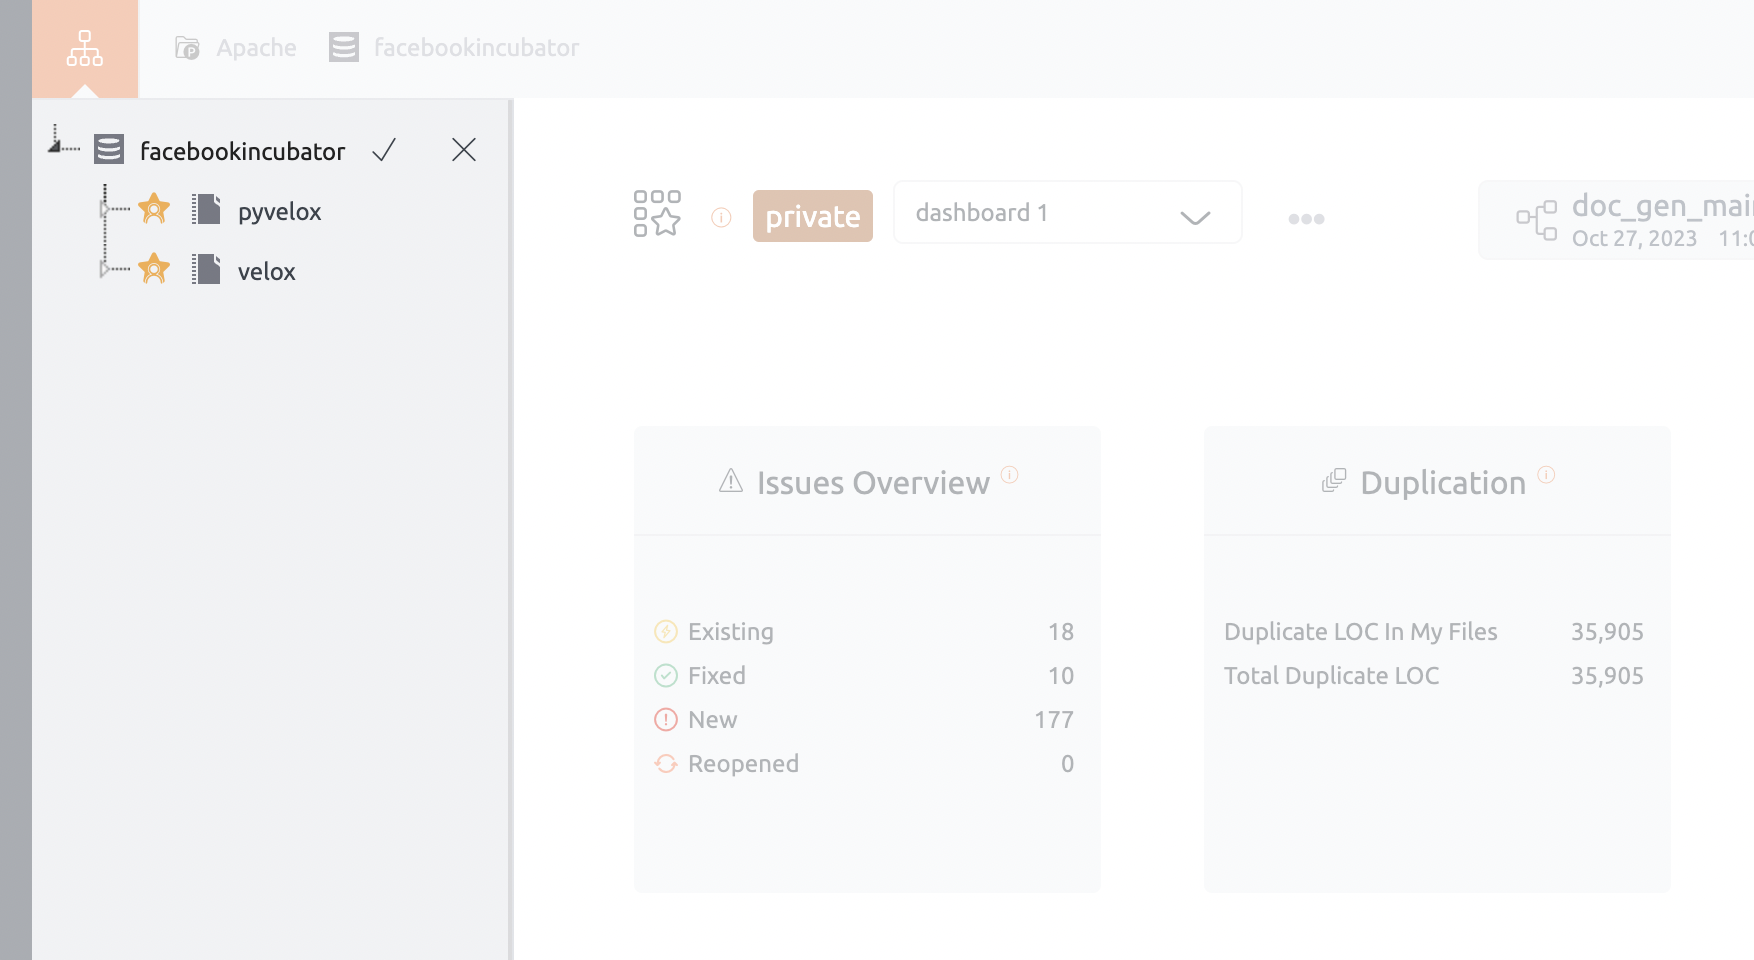
Selecting Files/Modules for Dashboards
Choose specific files or modules to customize the content of your dashboard.
- Selecting Specific Files/Modules: Choose the files or modules you want to include in your dashboard.
- Issues: Only issues related to the selected files/modules will be displayed on the dashboard page.
Editing Dashboards
Modify and customize existing dashboards to tailor them to your specific needs
- Select Dashboard: From the dropdown menu, select the dashboard you want to edit.
- Open File Tree: Click on the “Edit item” option to open the file tree and modify views.
- Save Changes: Confirm changes by clicking “Yes”. Discard changes by canceling or refreshing.
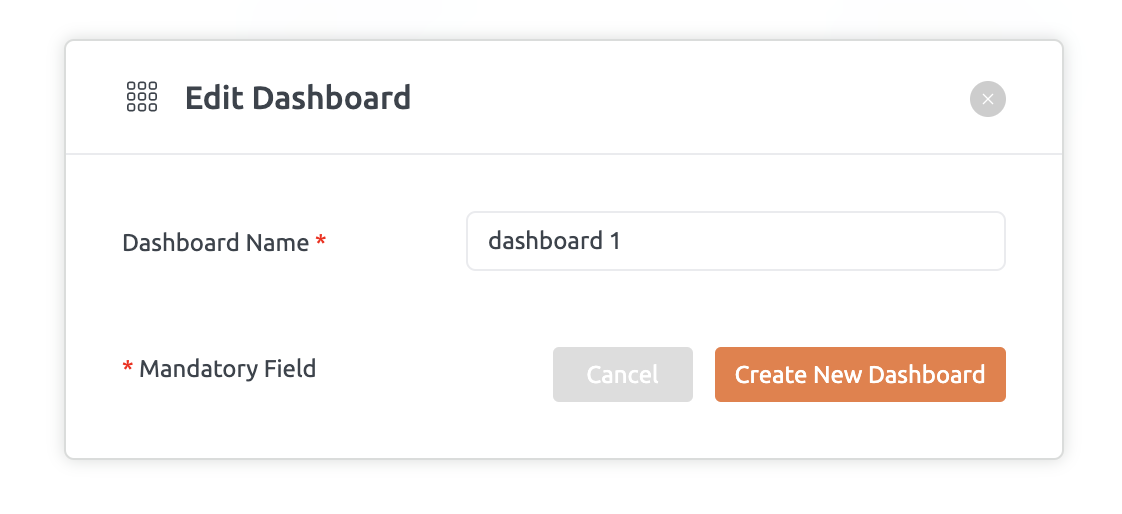
Renaming Dashboards
Update the name of a dashboard
- Choose Dashboard: Select the dashboard you wish to rename.
- Rename Option: Choose the rename option from the menu.
- Enter New Name: Enter a new, unique name in the popup that appears.

Resetting Dashboards
Clear all starred items within a dashboard to reset its settings
- Reset Function: Use the reset option to clear all selected file or module within the dashboard.

Deleting Dashboards
Remove a dashboard entirely from the system when it is no longer needed
- Select Dashboard: Choose the dashboard you want to delete from the dropdown menu.
- Delete Option: Select the delete option to remove the dashboard entirely.
- Confirm Deletion: Confirm the deletion action to proceed.
Privacy Settings Dashboards
Decide whether your dashboard should be public or private.
- Public Dashboards: Ensure your dashboard is set to public to share it via a link ,making it visible to all users with repository access..
- Visibility: Private dashboards are visible only to the creator.
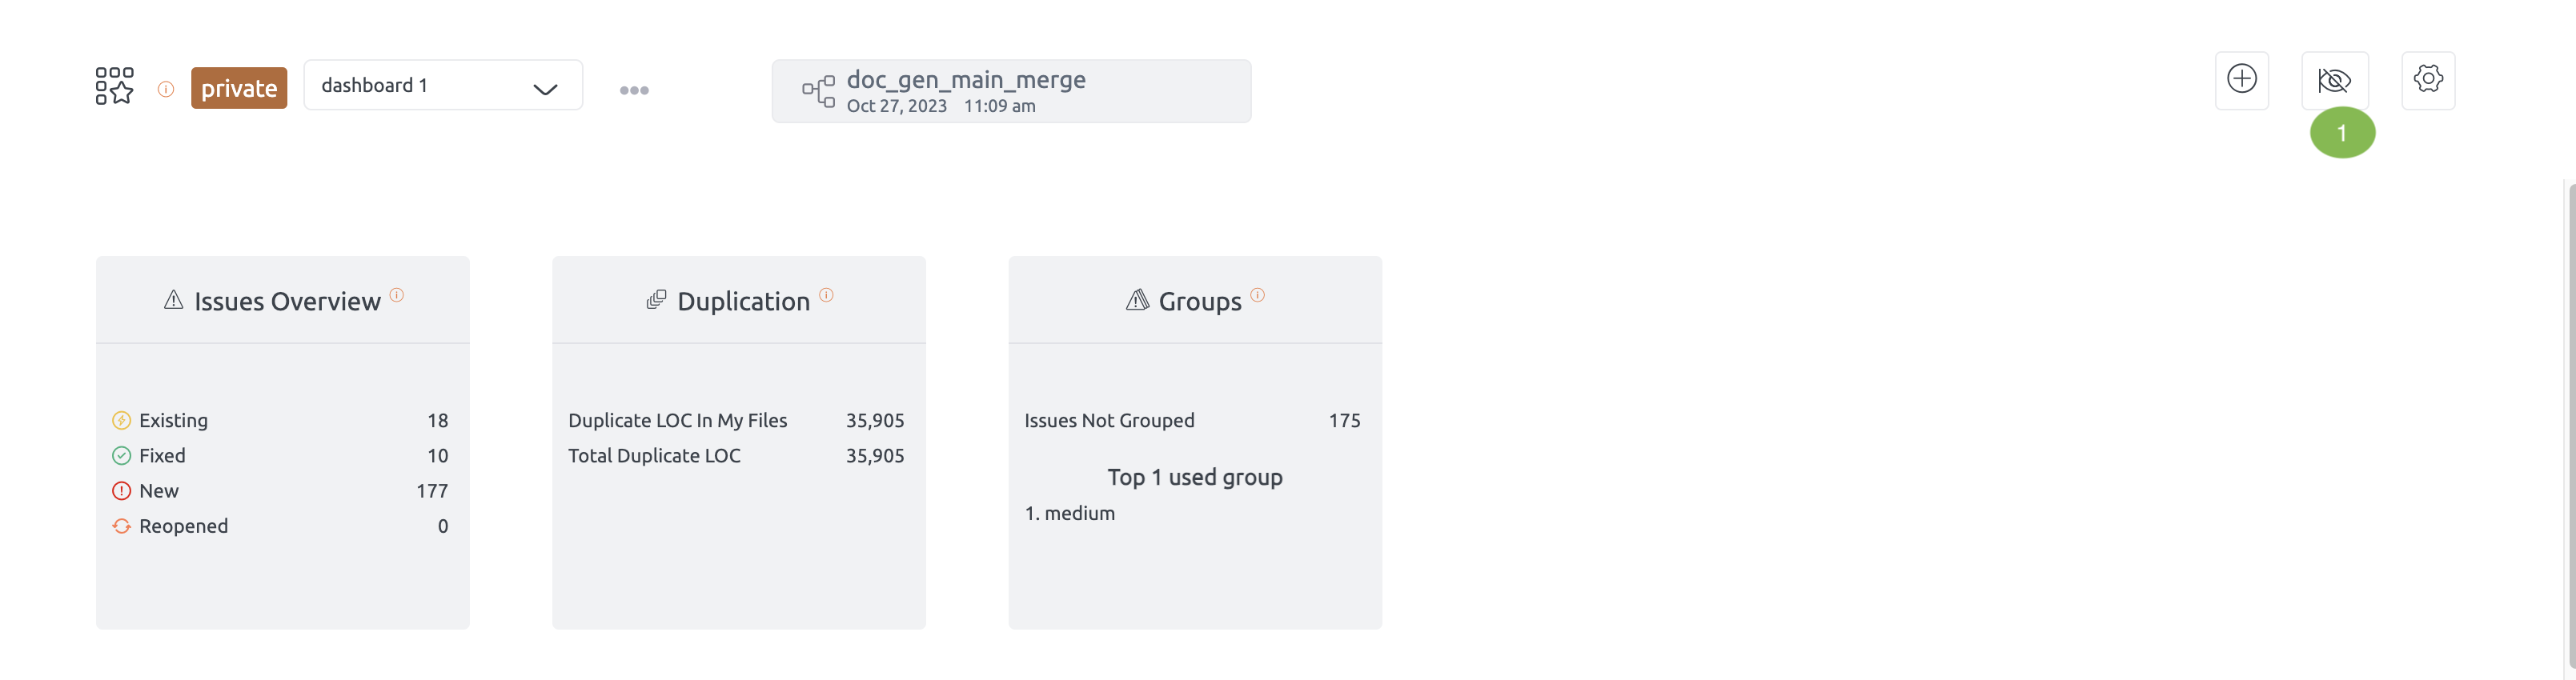

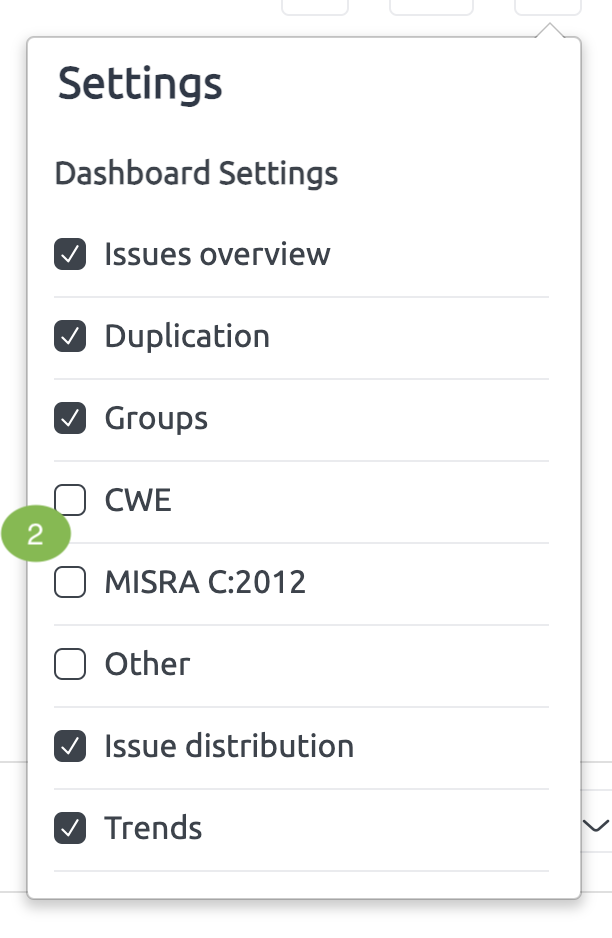
Widget Settings
Customize widget views individually for each dashboard.
- Customizing Widgets: Adjust widget views individually to tailor your dashboard’s layout and functionality to your specific needs.
- Maintaining Filters: Ensure that filter selections remain intact across sessions, preserving your customized views and configurations.
Active Dashboard
Most Visited Dashboard
- Navigation Efficiency: The most frequently visited dashboard will remain active when you navigate to the My Dashboard view without refreshing or using the browser back button.
Using Dashboards on the Issue Page
- Switching Dashboards:
- On the issue page, use the dropdown menu to switch between different dashboards.
- This allows you to filter and view issues based on the selected dashboard.
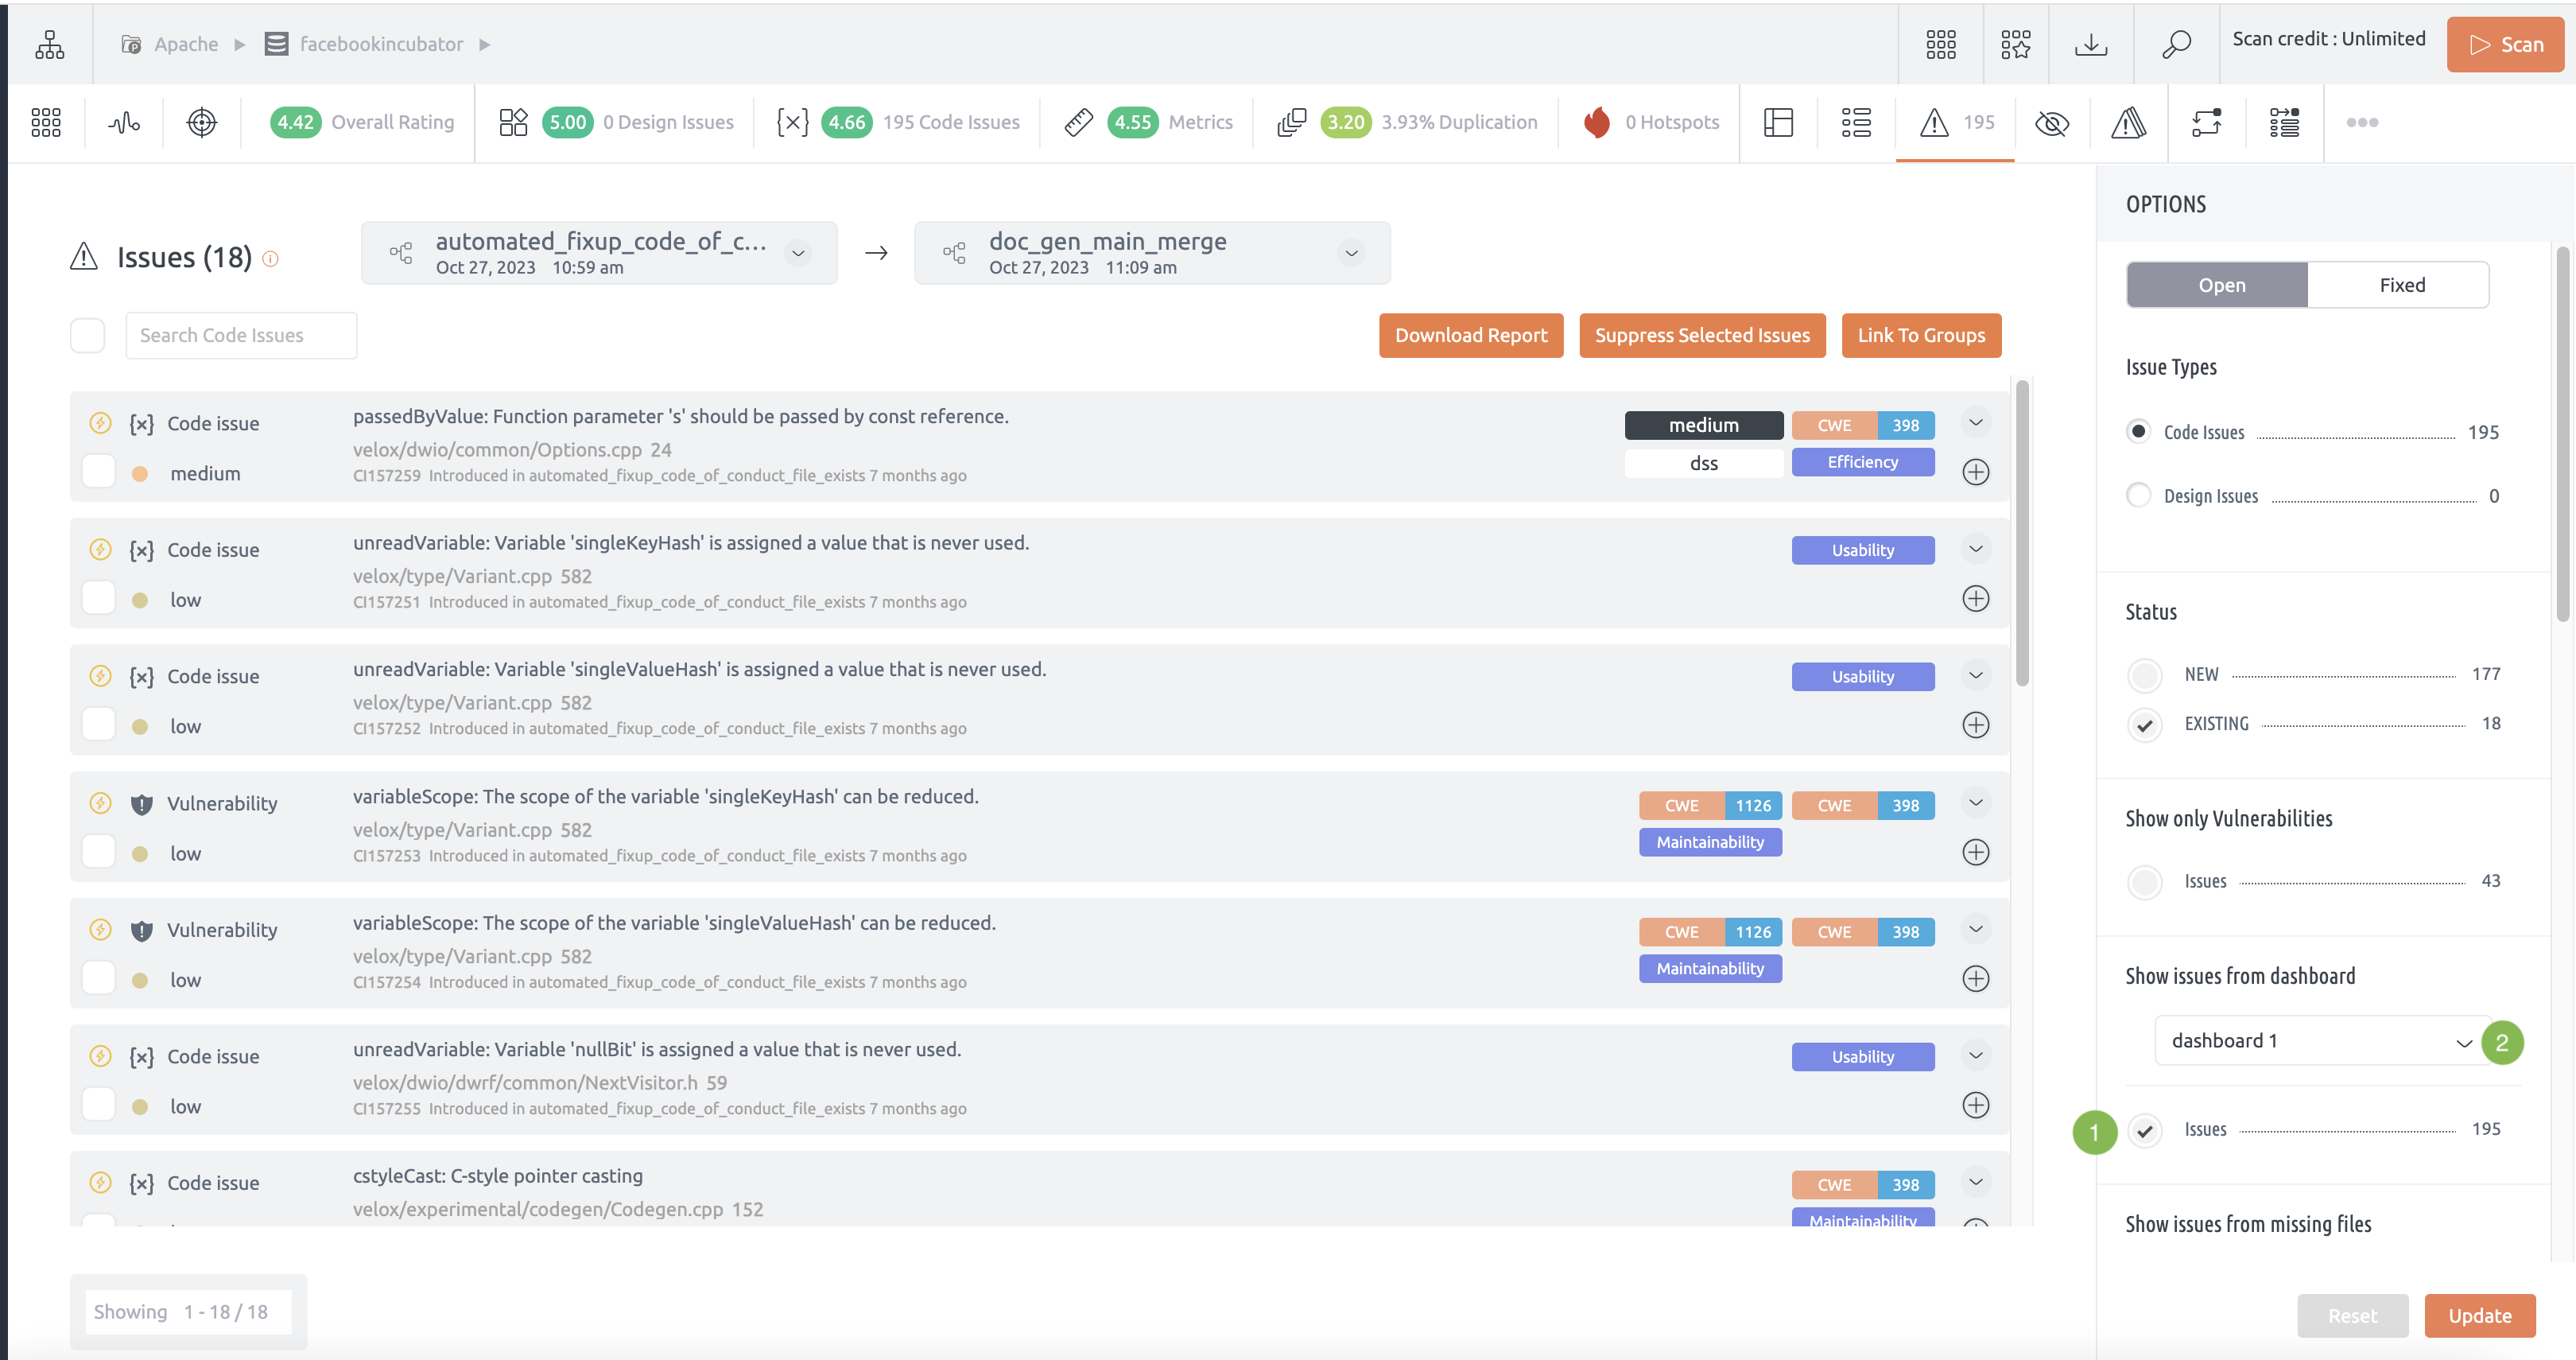
2.Filter Functionality:
- Issue Page Integration: When navigating to the issue page from a dashboard, filters applied on the dashboard carry over to the issue page.
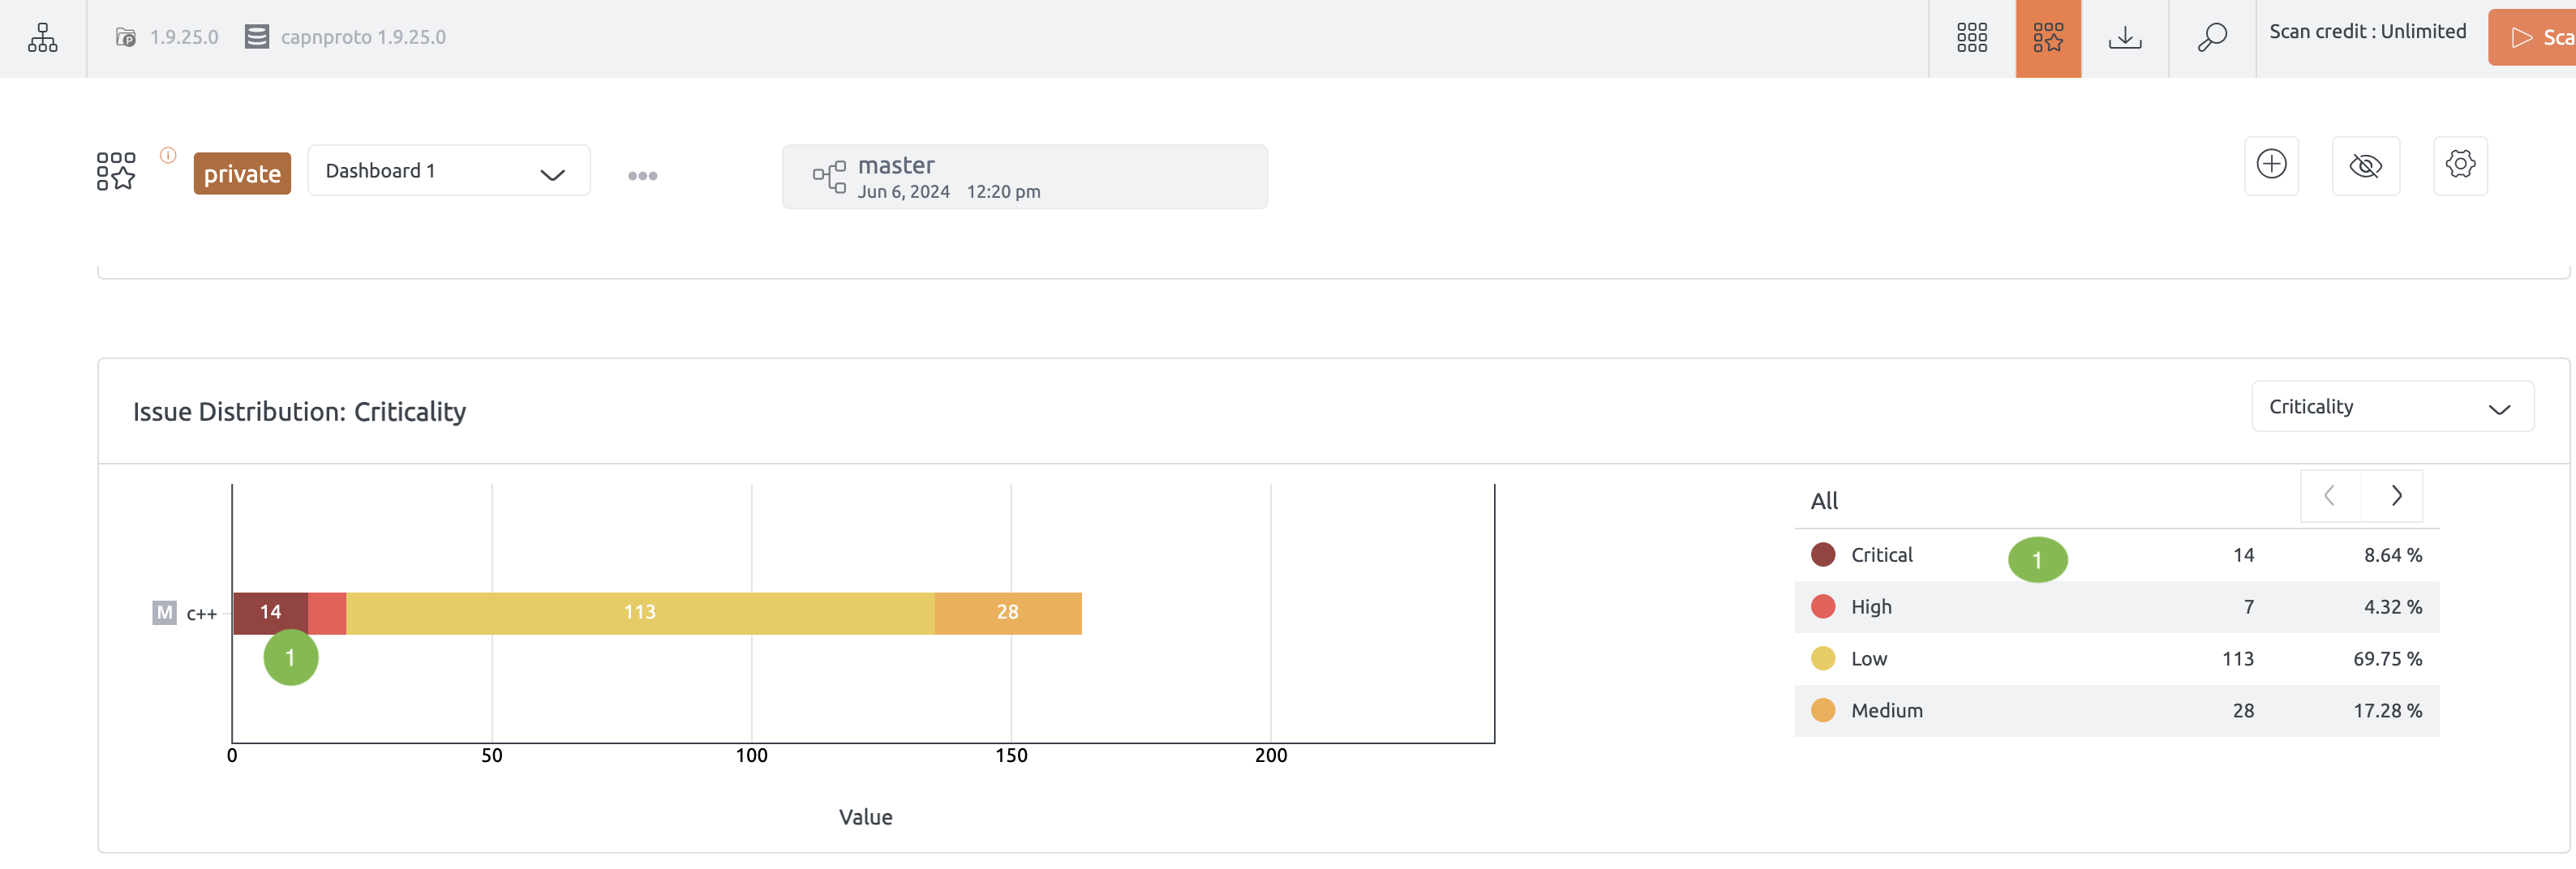
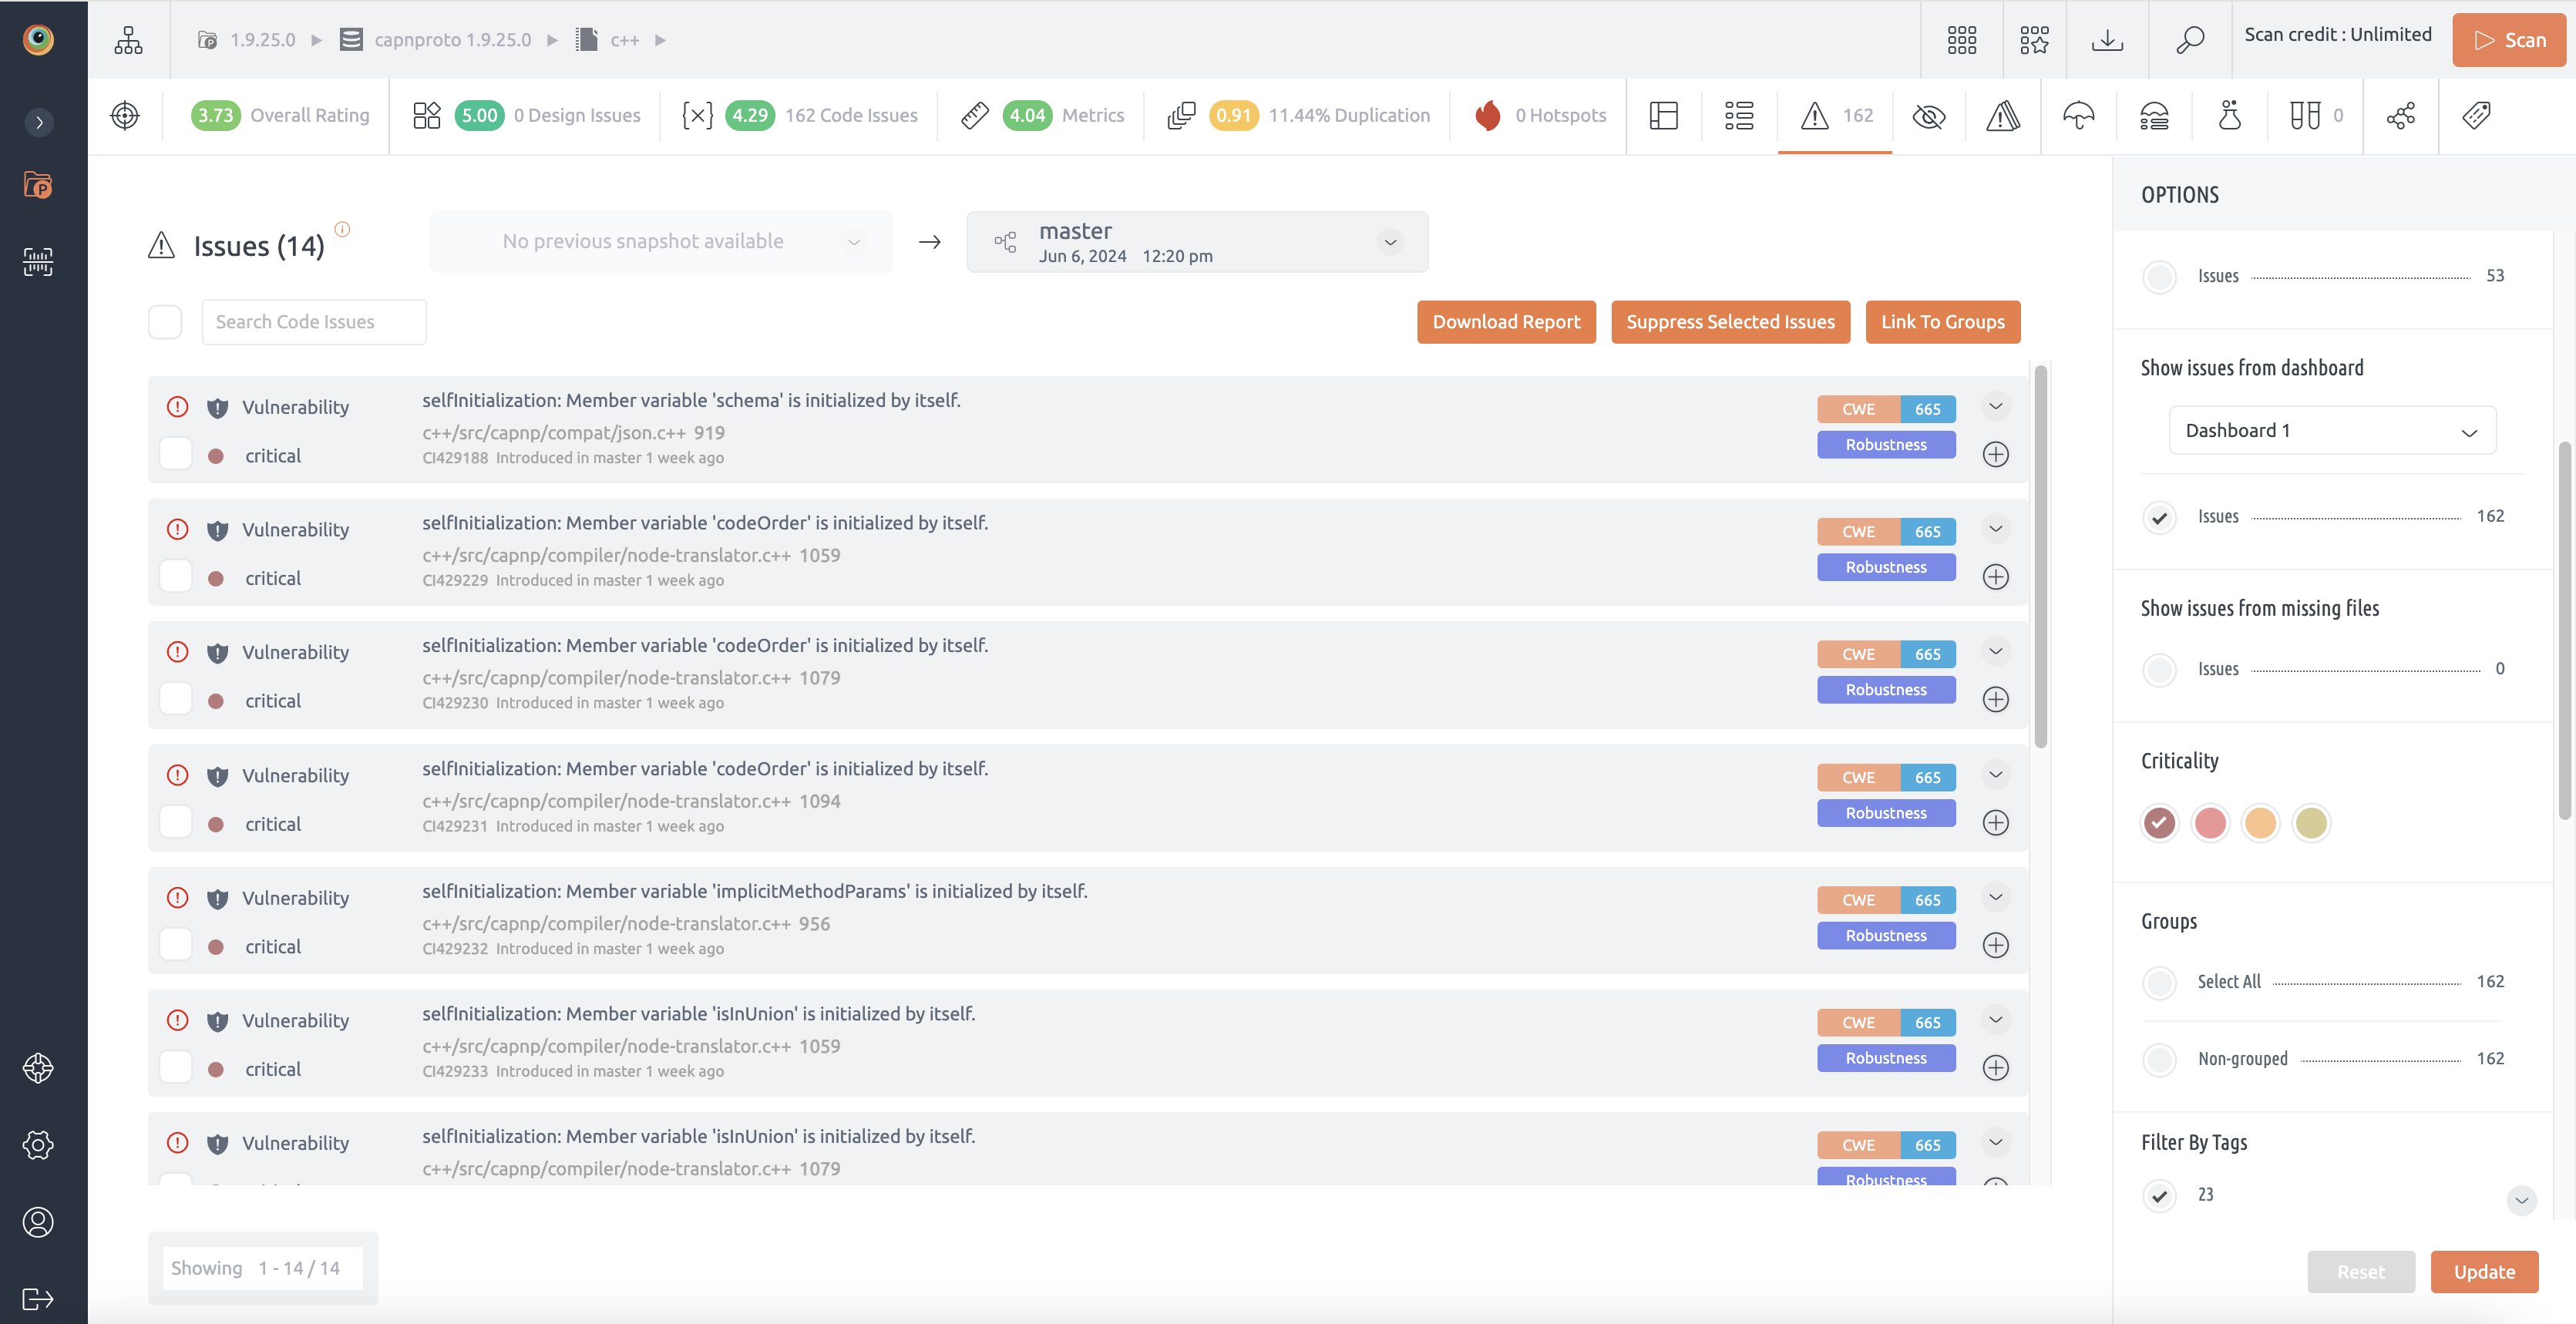
- Example: If you navigate from a team dashboard where you filtered issues by criticality (medium, high, low), only those specific issues will be selected on the issue page.
Specific Filters:
- Criticality Filter:
- Functionality: Select issues based on their criticality level (e.g., medium, high, low).
- Navigation: Clicking on a specific criticality filter on the dashboard directs you to the issue page with only issues of that criticality selected.
Access and Permissions
- Access Control:
- Manage Dashboard Option: Manage who can edit, rename, delete, reset, and share the dashboard via the manage dashboard option.
- Note: Explorer users will not appear in the user list for managing dashboards and can only create private dashboards.
- Making Dashboards Private or Public:
- Private Dashboards:
- Visibility: Only visible to the creator and access permissions.
- Creation: Explorers can create private dashboards but cannot make them public.
- Public Dashboards:
- Visibility: Visible to all users with repository access.
- Creation: Only users with repository access can create and share public dashboards.
- Private Dashboards: